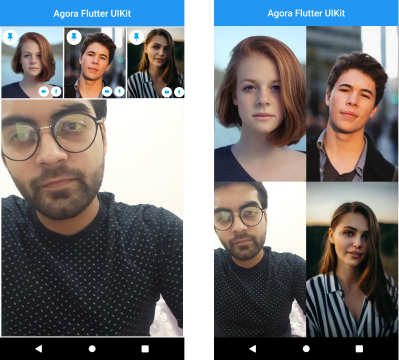
Using your favorite video streaming API just got easier with the introduction of the Agora Low Code Initiative, which enables users to build their video streaming application with just a few lines of code.
When you’re setting up your own streaming application with Agora, a few technical steps might slow you down. Now with Agora UIKit for Flutter, you can create a video streaming application with just a few lines of code.
In this tutorial, we will be going over how to use the Agora UIKit for Flutter to build your video streaming application and add some customizations.
Default Functionality
By default, the Agora Flutter UIKit library includes the following functionality before any customization:
- Automatically laying out all video streams
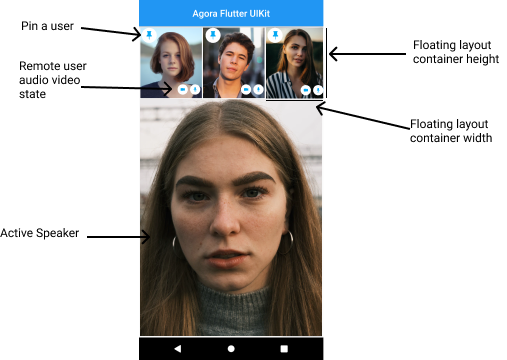
- Displaying the active speaker in the larger display in the floating layout
- Allowing you to swap any stream to the larger display in the floating layout
- Buttons for disabling the camera or the microphone, switching cameras for the local user, and disconnecting the call
- Lots of visual customization
- Live streaming mode with user role as a broadcaster or as an audience member
- Two default layouts: floating and grid
Prerequisites
- An Agora developer account (see How to Get Started with Agora)
- Flutter SDK
- VS Code or Android Studio
- An iOS or Android device for testing the application
- A basic understanding of Flutter development
Setup
Create a Flutter project and add agora_uikit as a dependency in your pubspec.yaml file:
dependencies:
 flutter:
  sdk: flutter
 agora_uikit:
Open your Android-level build.gradle and add jitpack to the end of the repositories:
allprojects {
  repositories {
     ...
     maven { url 'https://www.jitpack.io' }
  }
}
Adding Video Streaming to Your App
In this module, the main class type is AgoraClient. This class has two required parameters, agoraConnectionData and enabledPermission, which help in creating an instance of the RtcEngine and requesting the list of user permissions, respectively:
Initializing the Agora Flutter UIKit
Once you have initialized the UIKit, place the AgoraVideoViewer inside the MaterialApp. The AgoraVideoViewer class is used to display the user video layout. This class requires an object of AgoraClient as an argument:
Build Method
With this, you have integrated Agora video calling into your application in no time.
In addition, you can add the AgoraVideoButtons class in your build method to add, remove, or customize buttons:
Add Video and Buttons Layout
Putting it all together:
AgoraClient Class
AgoraClient is the main class that is used to initialize the Agora RtcEngine. As of the date of writing, agora_uikit is built using v4.0.1 of the Agora Flutter SDK.
Agora UIKit for Flutter takes two required parameters: agoraConnectionData and enabledPermissions. You can also provide the agoraChannelData and agoraEventHandler parameters:
agoraConnectionDatais used to initialize the Agora RtcEngine that takes an argument of type AgoraConnectionData(), through which you can pass your App Id, channel name, UID, temporary token, and/or token URL and thus set up your video call.enabledPermissionstakes a list of permissions that needs to be triggered before building any application. This list can contain permissions for camera, microphone, storage, location, etc.agoraChannelDatais used to define the properties of your channel and the user behavior in that particular channel. It takes arguments such as channel profile, client role, remote mic state, remote video state, dual-stream mode, stream fallback options, and much more.agoraEventHandlerextends theRtcEngineEventHandlerclass through which we can add functions that are executed from the given list of event handlers.
All this can be summarized by:
AgoraClient methods
Agora UIKit for Flutter automatically generates tokens for you such that you just have to provide the link to your deployed server. Have a look at this guide to follow the steps on how to generate your own token server. This can be summarized in your AgoraClient class as:
Using a token server
AgoraVideoViewer Class
AgoraVideoViewer is a customizable user video class for local and remote views that adjusts dynamically for the number of users. As of now, there are two default layouts Grid and Floating.

Features of the AgoraVideoViewerClass :
- Adjust the UI dynamically as the user joins or leaves.
- Focus on the active speaker (Floating layout).
- Pin local and remote users to the main screen (Floating layout).
- Show the state of the camera and the microphone of local and remote users.
- Customize the view that should be displayed when the remote video is turned off.

Here is a sample code to sum it up:
AgoraVideoViewer
To have a look at other methods and their usage, see the documentation.
AgoraVideoButtons Class
The AgoraVideoButtons class is a completely customizable class to add, remove, and customize the buttons in your layout. By default, the AgoraVideoButtons class has four built-in buttons : disconnect, switch camera, toggle camera, and toggle microphone button. You can use the enabledButtons method to remove any or all of the default buttons or change the order of these buttons.
In addition, you can use the extraButtons method to provide a list of buttons that you want to add according to your styling.

Here is a way to implement this:
Conclusion
Congratulations! You can now go ahead and build your own video calling and live video streaming application with just a few lines of code.
If there are features you think would be good to add to the Agora UIKit for Flutter that users would benefit from, feel free to fork the repository and add a pull request. Or open an issue on the repository with a feature request.
The plan is to grow this library and have similar offerings across all supported platforms. There are already similar libraries for Android, React Native, and iOS, so be sure to check those out.
Other Resources
The Agora UIKit library is available on pub.dev so make sure to go ahead and check it out. You can find the documentation for the library here.
For more information about building applications using Agora SDKs, take a look at the Agora Video Call Quickstart Guide and Agora API Reference.
And I invite you to join the Agora Developer Slack community.


