

This guide walks you through building your own tutoring application. This application will allow you to create lessons as a teacher and pay for and attend lessons as a student. These video lessons will be hosted on the platform. This will be a complete application including authentication, user management, payment, and tons of real-time features.
The tools we’ll use for this project are:
- Flutter
- Agora
- Firebase
- Riverpod
- Apple Pay with
paypackage - Other Flutter packages including:
image_picker,video_playerandintl - Custom back end built with Python and Flask
The code for the Flutter app can be found here. The back-end code can be found here. In this blog post, we will talk about the general structure of the application. And we’ll dive into the Agora Cloud Recording and Real-Time Transcription features.
Overview
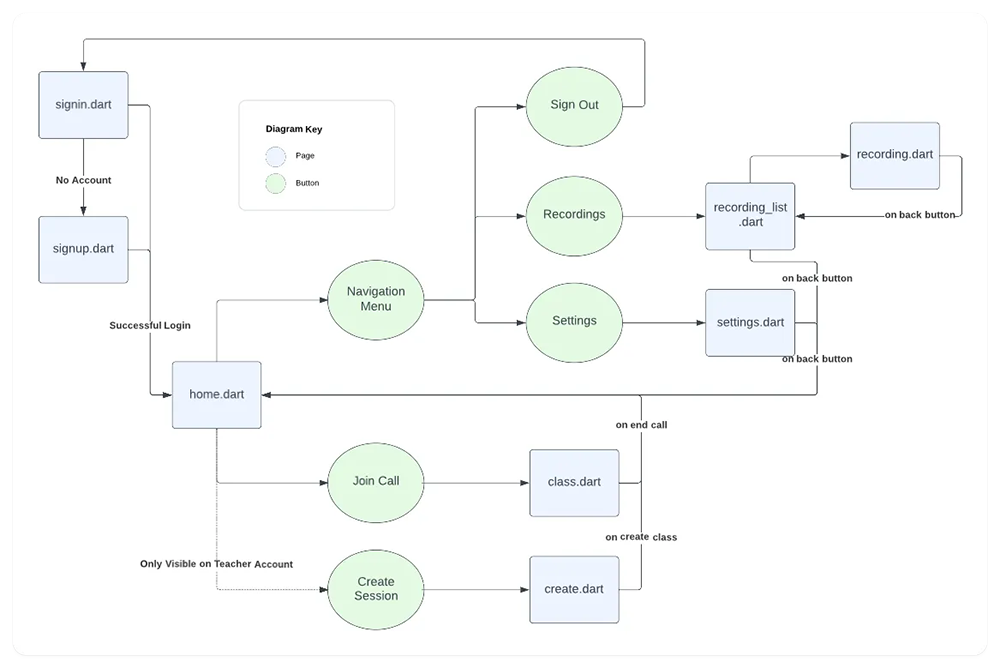
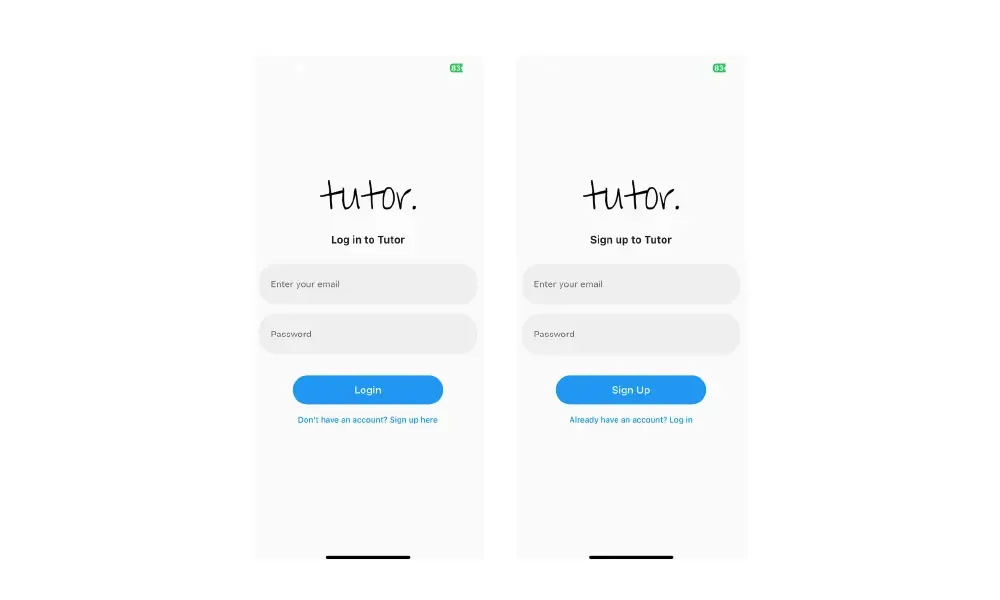
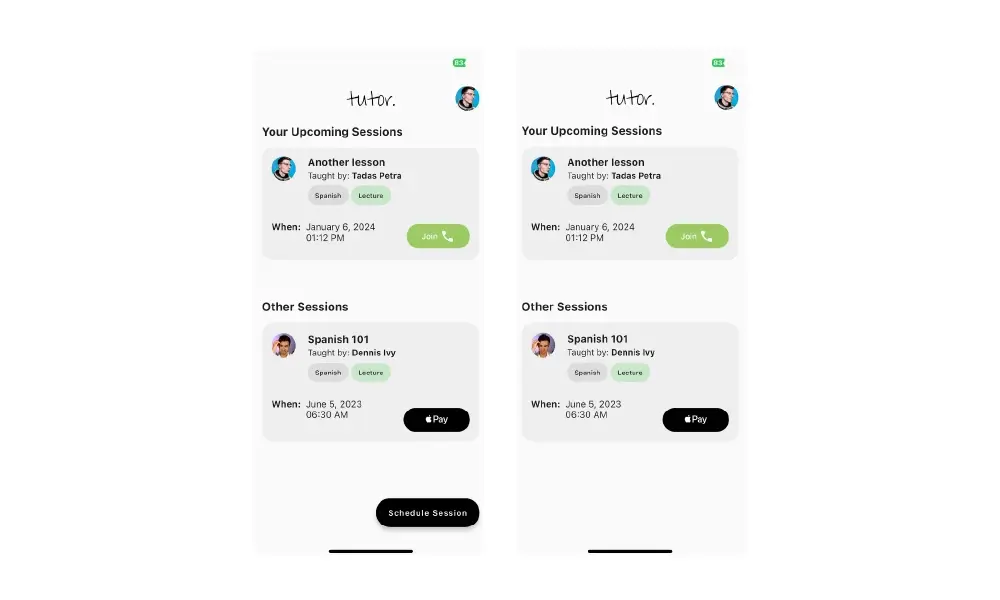
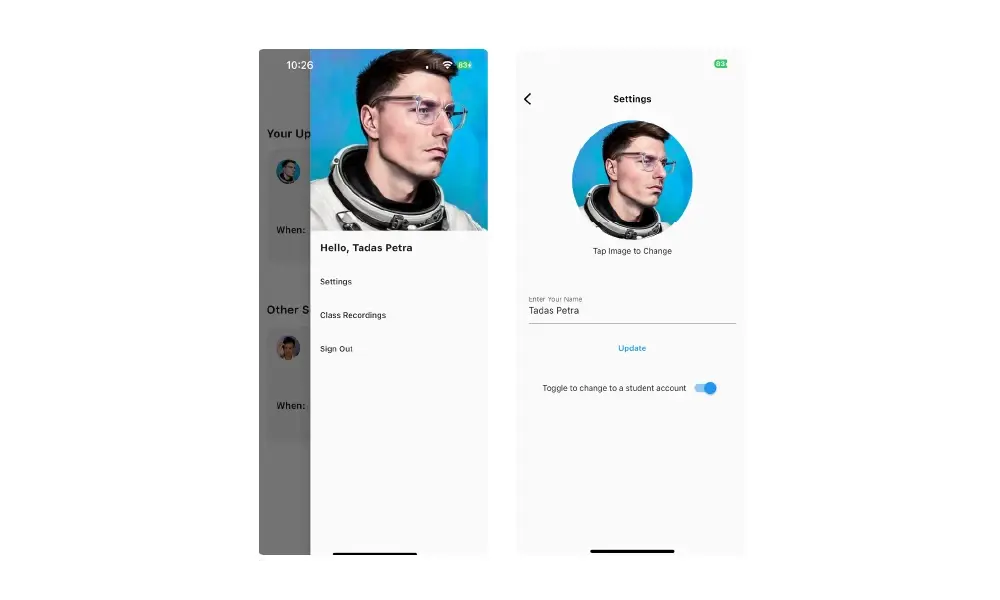
The tutor app will have users log in or sign up using Firebase Authentication, and it will have the state of the user managed and updated using Riverpod and Firebase Cloud Firestore. You can toggle between a teacher or a student account in the user settings. Both accounts have the ability to pay and join sessions, but the teacher account also has a special ability to create sessions.
Once the session is started, users can see the real-time text being converted and manage their cameras.
File Structure
lib
├── models
│ ├── recording
│ ├── session
│ └── user
├── pages
│ ├── home
│ ├── recordings
│ ├── class
│ ├── create
│ ├── settings
│ ├── signin
│ └── signup
├── protobuf
├── providers
│ └── user_provider
├── consts
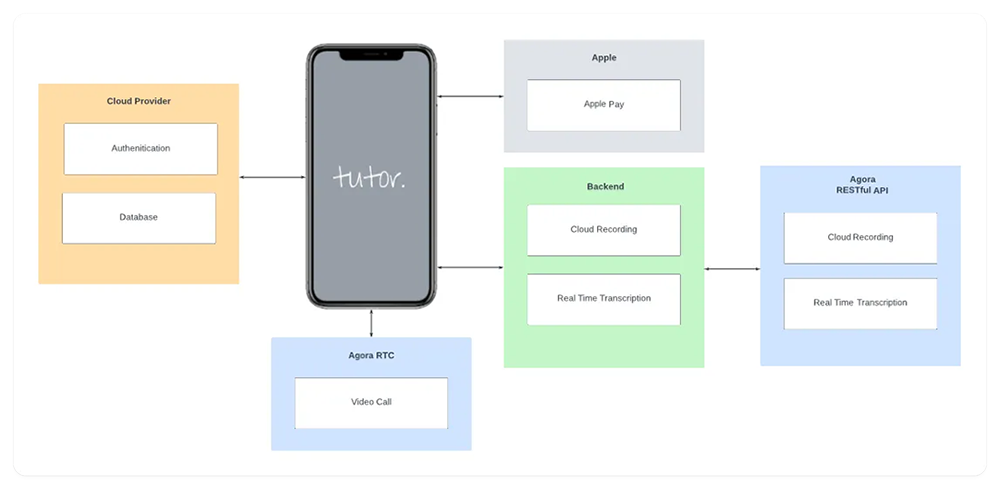
└── mainArchitecture Diagram

User Flow Diagram
App Screens
Login and Sign Up Screens
Teacher vs. Student Home Screen
Navigation and Settings Screens
Live Classroom Session

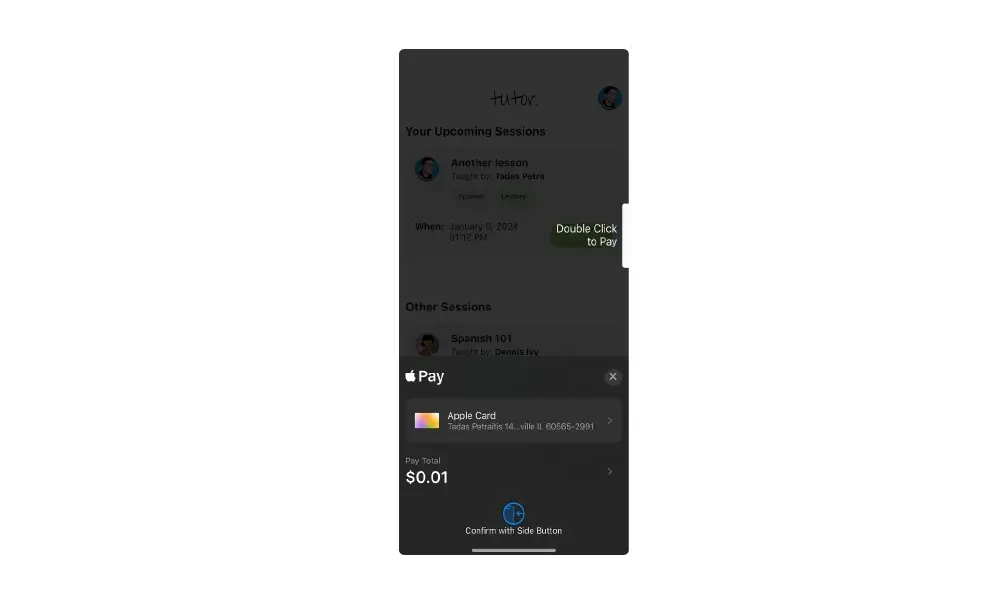
Apple Pay
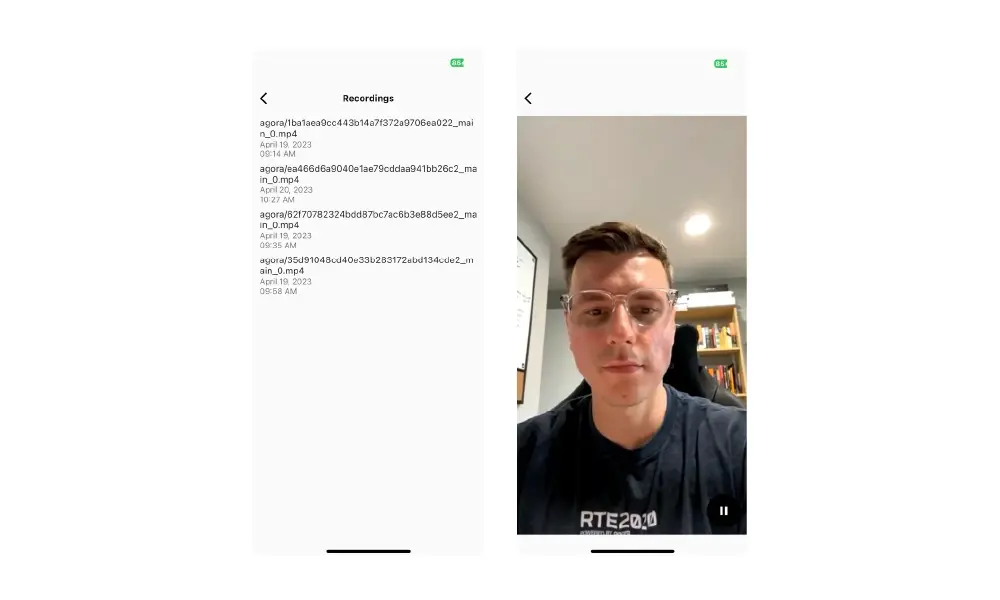
Recordings
Agora Overview
The main feature of the tutor app is the ability to have video call lessons between teachers and students. We will be using Agora for this. Agora is a real-time communication platform that allows you to build video calls, voice calls, and live streaming into your application. And it can handle all the real-time communication that will be needed for this application.
Agora Features
Video Call
The video call is the most important part of the application because this is where the teaching will happen. For this, we used the agora_uikit package to build the video call screen. This package is a wrapper around the Agora SDK, and it comes with a prebuilt UI, so we don't need to define it all ourselves.
You need an Agora account to use this package. You can create one at console.agora.io. Once you have an account, you need to create a project and get the App ID for the project. You need the App ID to connect to the Agora SDK.
Make sure to add the following permissions for both iOS and Android.
To add the package, run
flutter pub add agora_uikitTo secure your video calls, you must create a token server. Then we can link to it with our UI Kit. You can find more information about token servers here.
Once the set-up is complete, we can create a class.dart file and add the following code to it.
import 'package:agora_uikit/agora_uikit.dart';
import 'package:flutter/material.dart';

class ClassCall extends StatefulWidget {
  const ClassCall({Key? key}) : super(key: key);

  @override
  State<ClassCall> createState() => _ClassCallState();
}

class _ClassCallState extends State<ClassCall> {
  final AgoraClient client = AgoraClient(
    agoraConnectionData: AgoraConnectionData(
      appId: "<--Add your App Id here-->",
      channelName: "test",
      username: "user",
      tokenUrl: "<--Add your token server url here-->",
    ),
  );

  @override
  void initState() {
    super.initState();
    initAgora();
  }

  void initAgora() async {
    await client.initialize();
  }

  @override
  Widget build(BuildContext context) {
    return Scaffold(
        appBar: AppBar(
            title: const Text('Classroom'),
        ),
        body: SafeArea(
            child: Stack(
            children: [
                AgoraVideoViewer(
                    client: client,
                    layoutType: Layout.floating,
                ),
                AgoraVideoButtons(
                    client: client,
                ),
            ],
            ),
        ),
    );
  }
}
We want to allow users to leave this screen when they press the end call button. We don’t want them to be able to swipe backward, or have a back button in the app bar. To do this, we first removed the AppBar() widget, and then we added the onDisconnect function to the AgoraVideoButtons widget. This function will be called when the end call button is pressed. Inside this function we just call Navigator.pop(context). This will pop the current screen off the stack, and take the user back to the previous screen.
That will allow the user to not see a back button at the top, and only return back when they press the end call button. However, there are system back buttons to deal with. For both iOS and Android, you can either press a system back button or swipe back. To remove this capability we will use a WillPopScope widget. When we wrap it around our Scaffold, this widget will allow us to override the default behavior of the back button. We can do this by returning a Future<bool> from the onWillPop function. If we return true then the back button will work as normal. If we return false, then the back button will not work. You can customize the onWillPop function to allow the page to pop under different conditions, but for our use case we will set it to always return false.
Cloud Recording
With the Cloud Recording feature, you can connect your own database and record lessons in your app, saving a file in the database you connected. For this, we need to use the Agora RESTful API with our own back-end service.
The back-end service is required for security reasons. We don’t want to store our Agora customer key and customer secret in our application. This server was built with Python and Flask, and you can find the code here. We will cover only the Agora API side of this server, but if you want to learn more about building a server from scratch with Flask, I recommend this video.
We will implement two functions on our back-end server: start-recording and stop-recording.
Start Recording
Our start-recording endpoint needs a channel for our backend to know which channel this recording should be started on. Once it is started, we need to provide the caller with the endpoint, the SID, and the resource ID so that the caller knows exactly where this recording will be stored.
We cannot start the recording right away. The first step of cloud recording is to create a resource for cloud recording. And to create a resource we need a credential. To generate a credential, we need a customer key and customer secret. You can create these in the Agora Console.

To get a complete credential that can be used to generate a resource, we need to encode our customer key and customer secret. We can do this with the following code.
def generate_credential():
    # Generate encoded token based on customer key and secret
    credentials = CUSTOMER_KEY + ":" + CUSTOMER_SECRET
    base64_credentials = base64.b64encode(credentials.encode("utf8"))
    credential = base64_credentials.decode("utf8")
    return credential
Using our credential, we then need to generate that resource using acquire. This method will return a resource ID that corresponds to the resource that was created. We will use this ID to start our recording.
def generate_resource(channel):
    payload = {
        "cname": channel,
        "uid": str(UID),
        "clientRequest": {}
    }
    headers = {}

    headers['Authorization'] = 'basic ' + credential
    headers['Content-Type'] = 'application/json'
    headers['Access-Control-Allow-Origin'] = '*'

    url = f"https://api.agora.io/v1/apps/{APP_ID}/cloud_recording/acquire"
    res = requests.post(url, headers=headers, data=json.dumps(payload))

    data = res.json()
    resourceId = data["resourceId"]
    return resourceId
Now we are ready to start the recording. You can find more details about all the configurations that you should set up here.
Here are some key features for our configuration
- We record in
mixmode, so videos get combined into one file. - We save this file into an
agorafolder on AWS. - We save an
mp4file.
def start_cloud_recording(channel):
    resource_id = generate_resource(channel)
    url = f"https://api.agora.io/v1/apps/{APP_ID}/cloud_recording/resourceid/{resource_id}/mode/mix/start"
    payload = {
        "cname": channel,
        "uid": str(UID),
        "clientRequest": {
            "token": TEMP_TOKEN,
            "recordingConfig": {
                "maxIdleTime": 3,
            },
            "storageConfig": {
                "secretKey": SECRET_KEY,
                "vendor": 1,  # 1 is for AWS
                "region": 1,
                "bucket": BUCKET_NAME,
                "accessKey": ACCESS_KEY,
                "fileNamePrefix": [
                    "agora",
                ]
            },
            "recordingFileConfig": {
                "avFileType": [
                    "hls",
                    "mp4"
                ]
            },
        },
    }
    headers = {}
    headers['Authorization'] = 'basic ' + credential
    headers['Content-Type'] = 'application/json'
    headers['Access-Control-Allow-Origin'] = '*'
    res = requests.post(url, headers=headers, data=json.dumps(payload))
    data = res.json()
    sid = data["sid"]
    return resource_id, sid
With the back-end service complete, we can implement the cloud recording in our application. To do this, we need to add our link to the cloudRecordingUrl argument in our AgoraClient and set cloudRecordingEnabled: true on our AgoraVideoButtons widget.
Stop Recording
To stop the recording, we need to implement another function on the backend. Nothing else needs to be done on the front end side, since that is taken care of by the UI Kit. We just need a working endpoint that follows the /stop-recording/<--Channel Name-->/<--SID-->/<--Resource ID--> format.
The key part here is we need to return the information to the end user-specifically the mp4 link.
def stop_cloud_recording(channel, resource_id, sid):
    url = f"https://api.agora.io/v1/apps/{APP_ID}/cloud_recording/resourceid/{resource_id}/sid/{sid}/mode/mix/stop"

    headers = {}
    headers['Authorization'] = 'basic ' + credential
    headers['Content-Type'] = 'application/json;charset=utf-8'
    headers['Access-Control-Allow-Origin'] = '*'
    payload = {
        "cname": channel,
        "uid": str(UID),
        "clientRequest": {
        }
    }
    res = requests.post(url, headers=headers, data=json.dumps(payload))
    data = res.json()
    resource_id = data['resourceId']
    sid = data['sid']
    server_response = data['serverResponse']
    mp4_link = server_response['fileList'][0]['fileName']
    m3u8_link = server_response['fileList'][1]['fileName']
    formatted_data = {'resource_id': resource_id, 'sid': sid,
                      'server_response': server_response, 'mp4_link': mp4_link, 'm3u8_link': m3u8_link}
    return formatted_data
View Recorded Lessons
To view the recordings at any moment after the video call, we first need to store a link to the file's location. Our app was built with Firebase Authentication and Firestore storage, so it makes sense to store the link in Firestore.
To do this, there is a cloudRecordingCallback function on the AgoraClient that returns the mp4 link for us.
First, we create a data class to hold all the information we need regarding the recording.
class Recording {
  final String url;
  final String sessionId;
  final String date;
  Recording({
    required this.url,
    required this.sessionId,
    required this.date,
  });
}
Then, since our app is built around the UserProvider, we will set up a function in the StateNotifier to store the recording.
Future<void> storeRecording(Recording recording) {
  return _firestore
      .collection("users")
      .doc(state.id)
      .collection("recordings")
      .add(
        recording.toMap(),
      );
}
Finally, we can call this function in our cloudRecordingCallback.
ref.read(userProvider.notifier).storeRecording(
      Recording(
        url: mp4,
        sessionId: widget.sessionId,
        date:
            "${DateFormat.yMMMMd('en_US').format(DateTime.now())}\n${DateFormat("hh:mm a").format(DateTime.now())}",
      ),
    );
We display these recordings by showing a list of all the recordings for the user. They can click each recording to view its playback. To do that, we will add another function to our user provider to retrieve all the needed data.
Future<List<Recording>> getRecordings() async {
  QuerySnapshot response = await _firestore
      .collection("users")
      .doc(state.id)
      .collection("recordings")
      .get();
  List<Recording> recordings = [];
  for (DocumentSnapshot snapshot in response.docs) {
    recordings
        .add(Recording.fromMap(snapshot.data() as Map<String, dynamic>));
  }
  return recordings;
}
Then, we display a list view of the recordings that can be accessed through the Drawer widget.
class RecordingList extends ConsumerWidget {
  const RecordingList({super.key});
  @override
  Widget build(BuildContext context, WidgetRef ref) {
    return Scaffold(
      appBar: AppBar(
        title: const Text('Recordings'),
      ),
      body: FutureBuilder(
          future: ref.watch(userProvider.notifier).getRecordings(),
          builder: (context, snapshot) {
            if (snapshot.hasData) {
              return ListView.builder(
                itemCount: snapshot.data!.length,
                itemBuilder: (context, index) {
                  return ListTile(
                    title: Text(snapshot.data![index].url),
                    subtitle: Text(snapshot.data![index].date),
                    onTap: () {
                      Navigator.push(
                        context,
                        MaterialPageRoute(
                          builder: (context) => Recording(
                            url: snapshot.data![index].url,
                          ),
                        ),
                      );
                    },
                  );
                },
              );
            } else {
              return const Center(child: CircularProgressIndicator());
            }
          }),
    );
  }
}
Finally, using the video_player package, we display the video on a new screen.
class Recording extends StatefulWidget {
  final String url;
  const Recording({super.key, required this.url});
  @override
  State<Recording> createState() => _RecordingState();
}

class _RecordingState extends State<Recording> {
  late VideoPlayerController _controller;
  late Future<void> _initializeVideoPlayerFuture;
  @override
  void initState() {
    super.initState();
    _controller = VideoPlayerController.network(
      "https://agora-server.s3.us-east-2.amazonaws.com/${widget.url}",
    );
    _initializeVideoPlayerFuture = _controller.initialize();
    _controller.setLooping(true);
  }
  @override
  void dispose() {
    _controller.dispose();
    super.dispose();
  }
  @override
  Widget build(BuildContext context) {
    return Scaffold(
      appBar: AppBar(),
      body: FutureBuilder(
        future: _initializeVideoPlayerFuture,
        builder: (context, snapshot) {
          if (snapshot.connectionState == ConnectionState.done) {
            return AspectRatio(
              aspectRatio: _controller.value.aspectRatio,
              child: VideoPlayer(_controller),
            );
          } else {
            return const Center(
              child: CircularProgressIndicator(),
            );
          }
        },
      ),
      floatingActionButton: FloatingActionButton(
        onPressed: () {
          setState(() {
            if (_controller.value.isPlaying) {
              _controller.pause();
            } else {
              _controller.play();
            }
          });
        },
        child: Icon(
          _controller.value.isPlaying ? Icons.pause : Icons.play_arrow,
        ),
      ),
    );
  }
}
Real-Time Transcription
The Real-Time Transcription feature uses a process similar to the Cloud Recording feature. Again, we will need to use the Agora RESTful API with our own back-end service.
The back-end service is required for security reasons. We don’t want to store our Agora customer key and customer secret in our application. This server was built with Python and Flask, and you can find the code here. We will cover only the Agora API side of this server, but if you want to learn more about building a server from scratch with Flask, I recommend this video.
We will implement two functions on our back-end server: start-transcribing and stop-transcribing.
Start Transcribing
Our start-transcribing endpoint needs a channel so that our backend knows which channel this transcription should be started on. Once it is started, we need to provide the caller with the endpoint, the task ID, and the builder token so that the caller knows exactly where this transcription will be stored.
We cannot start transcribing right away. The first step of real-time transcription is to create a resource for transcribing. To create a resource, we need a credential. To generate a credential, we need a customer key and customer secret. You can create these in the Agora Console.
def rtt_generate_resource(channel):
    payload = {
        "instanceId": channel,
    }
    headers = {}
    headers['Authorization'] = 'basic ' + credential
    headers['Content-Type'] = 'application/json'
    headers['Access-Control-Allow-Origin'] = '*'
    url = f"https://api.agora.io/v1/projects/{APP_ID}/rtsc/speech-to-text/builderTokens"
    res = requests.post(url, headers=headers, data=json.dumps(payload))
    data = res.json()
    tokenName = data["tokenName"]
    return tokenName
Using our credential, we then need to generate that resource using acquire. This method will return a tokenName that corresponds to the resource that was created. We will use the tokenName to start transcribing.
def rtt_generate_resource(channel):
    payload = {
        "instanceId": channel,
    }
    headers = {}
    headers['Authorization'] = 'basic ' + credential
    headers['Content-Type'] = 'application/json'
    headers['Access-Control-Allow-Origin'] = '*'
    url = f"https://api.agora.io/v1/projects/{APP_ID}/rtsc/speech-to-text/builderTokens"
    res = requests.post(url, headers=headers, data=json.dumps(payload))
    data = res.json()
    tokenName = data["tokenName"]
    return tokenName
Now, we are ready to start transcribing. You can find more details about all the configurations you should set up here.
Here are some key features for our configuration:
- We can transcribe in English and Spanish
- We store the transcription in a folder named rtt
def start_transcription(channel):
    tokenName = rtt_generate_resource(channel)
    url = f"https://api.agora.io/v1/projects/{APP_ID}/rtsc/speech-to-text/tasks?builderToken={tokenName}"
    payload = {
        "audio": {
            "subscribeSource": "AGORARTC",
            "agoraRtcConfig": {
                "channelName": channel,
                "uid": "101",
                "token": "{{channelToken}}",
                "channelType": "LIVE_TYPE",
                "subscribeConfig": {
                    "subscribeMode": "CHANNEL_MODE"
                },
                "maxIdleTime": 60
            }
        },
        "config": {
            "features": [
                "RECOGNIZE"
            ],
            "recognizeConfig": {
                "language": "en-US,es-ES",
                "model": "Model",
                "output": {
                    "destinations": [
                        "AgoraRTCDataStream",
                        "Storage"
                    ],
                    "agoraRTCDataStream": {
                        "channelName": channel,
                        "uid": "101",
                        "token": "{{channelToken}}"
                    },
                    "cloudStorage": [
                        {
                            "format": "HLS",
                            "storageConfig": {
                                "accessKey": ACCESS_KEY,
                                "secretKey": SECRET_KEY,
                                "bucket": BUCKET_NAME,
                                "vendor": 1,
                                "region": 1,
                                "fileNamePrefix": [
                                    "rtt"
                                ]
                            }
                        }
                    ]
                }
            }
        }
    }
    headers = {}
    headers['Authorization'] = 'basic ' + credential
    headers['Content-Type'] = 'application/json'
    res = requests.post(url, headers=headers, data=json.dumps(payload))
    data = res.json()
    taskID = data["taskId"]
    return taskID, tokenName
To start this process, we add this call to the initState of our StatefulWidget.
final response = await http.post(
  Uri.parse(
      'https://agora-server-hr4b.onrender.com/start-transcribing/main'),
);
taskId = jsonDecode(response.body)['taskId'];
builderToken = jsonDecode(response.body)['builderToken'];
Custom Actions from Agora Events
But calling this endpoint doesn’t show anything in our application. To do that, we need to set up a protobuf for our project.
Here is a template for Agora Real-Time Transcription
syntax = "proto3";

package agora.audio2text;
option java_package = "io.agora.rtc.audio2text";
option java_outer_classname = "Audio2TextProtobuffer";

message Text {
  int32 vendor = 1;
  int32 version = 2;
  int32 seqnum = 3;
  int32 uid = 4;
  int32 flag = 5;
  int64 time = 6;
  int32 lang = 7;
  int32 starttime = 8;
  int32 offtime = 9;
  repeated Word words = 10;
}
message Word {
  string text = 1;
  int32 start_ms = 2;
  int32 duration_ms = 3;
  bool is_final = 4;
  double confidence = 5;
}
Once the protocol buffer is set up, we retrieve the transcribed message from the onStreamMessage callback. We can take this message, run it through our protobuf, and add the text to a list.
agoraEventHandlers: AgoraRtcEventHandlers(
  onStreamMessage:
      (connection, remoteUid, streamId, data, length, sentTs) {
    protoText.Text sttText = protoText.Text.fromBuffer(data);
    if (sttText.words.isNotEmpty) {
      sttText.words.last.isFinal
          ? updateConversation(sttText.words.last.text)
          : null;
    }
  },
  onStreamMessageError:
      (connection, remoteUid, streamId, code, missed, cached) {
    print("error $code");
  },
)
When we add this view to our stack we can see the transcription happening live.
Padding(
  padding: const EdgeInsets.only(bottom: 100.0, top: 200),
  child: ListView.builder(
    controller: _controller,
    itemBuilder: (context, index) {
      return ListTile(
        title: Text(
          conversation[index],
          style: const TextStyle(
            color: Colors.white,
          ),
        ),
      );
    },
    itemCount: conversation.length,
  ),
),
Stop Transcription
The last step is to stop the transcription after the call is complete. We need a working endpoint that follows the /stop-transcribing/<--Channel Name-->/<--Task ID-->/<--Builder Token--> format.
def stop_transcription(task_id, builder_token):
    url = f"https://api.agora.io/v1/projects/{APP_ID}/rtsc/speech-to-text/tasks/{task_id}?builderToken={builder_token}"
    headers = {}
    headers['Authorization'] = 'basic ' + credential
    headers['Content-Type'] = 'application/json'
    payload = {}
    res = requests.delete(url, headers=headers, data=payload)
    data = res.json()
    return data
Then, we call that endpoint from our Flutter application whenever the endCall button is pressed, and our real-time transcription will be complete.
http.get(Uri.parse(
  'https://agora-server-hr4b.onrender.com/stop-transcribing/$taskId/$builderToken'));
Other Key Features
Apple Pay Integration
To have Apple Pay on your app, you need to be a valid merchant and have your merchant ID connected to your application. You can find more information about that on this Apple Pay Guide.
Once you have that setup, on the onPaymentResult argument in the Apple Pay button, we will execute a joinSession function defined by our user provider. This function will add the session to the current student's upcoming sessions list and that student's ID to the class's student list.
Future<void> joinSession(String sessionId, bool isLecture) async {
  await _firestore.collection("users").doc(state.id).update({
    'upcomingSessions': FieldValue.arrayUnion([sessionId])
  });
  if (!isLecture) {
    await _firestore.collection("sessions").doc(sessionId).update({
      'students': FieldValue.arrayUnion([state.id])
    });
  }
  state = state.copyWith(
      user: state.user.copyWith(
          upcomingSessions: [...state.user.upcomingSessions, sessionId]));
}


