Hey devs, in this demo, I’ll walk you through the steps to create a video calling app using Unreal Engine with the Agora SDK plug-in.
For this example, I’ll use Unreal Engine 5.1 and the current Agora SDK.
Getting Started
Create a Project
I’ve created a basic C++ Unreal Engine project with the UI Blueprint widget implemented. Clone this GitHub repo for a quick start. You should be able to open the project with the Unreal Engine 5 Editor. If you want to build everything from scratch, follow these steps:
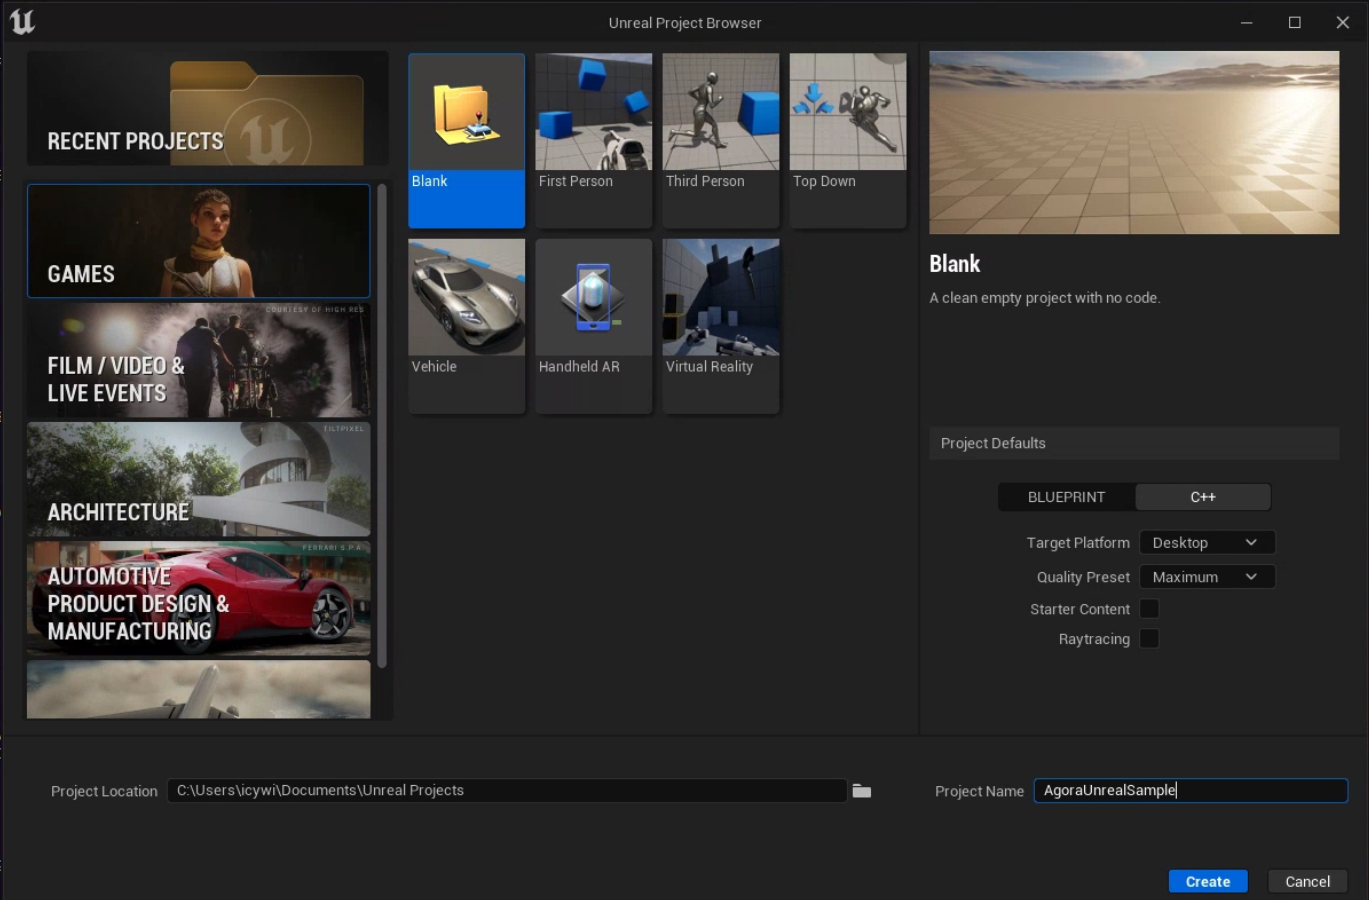
- Open the Unreal Editor and click New project
- On the New Project panel, choose C++ as the project type, enter the project name, choose the project location, and click Create Project.
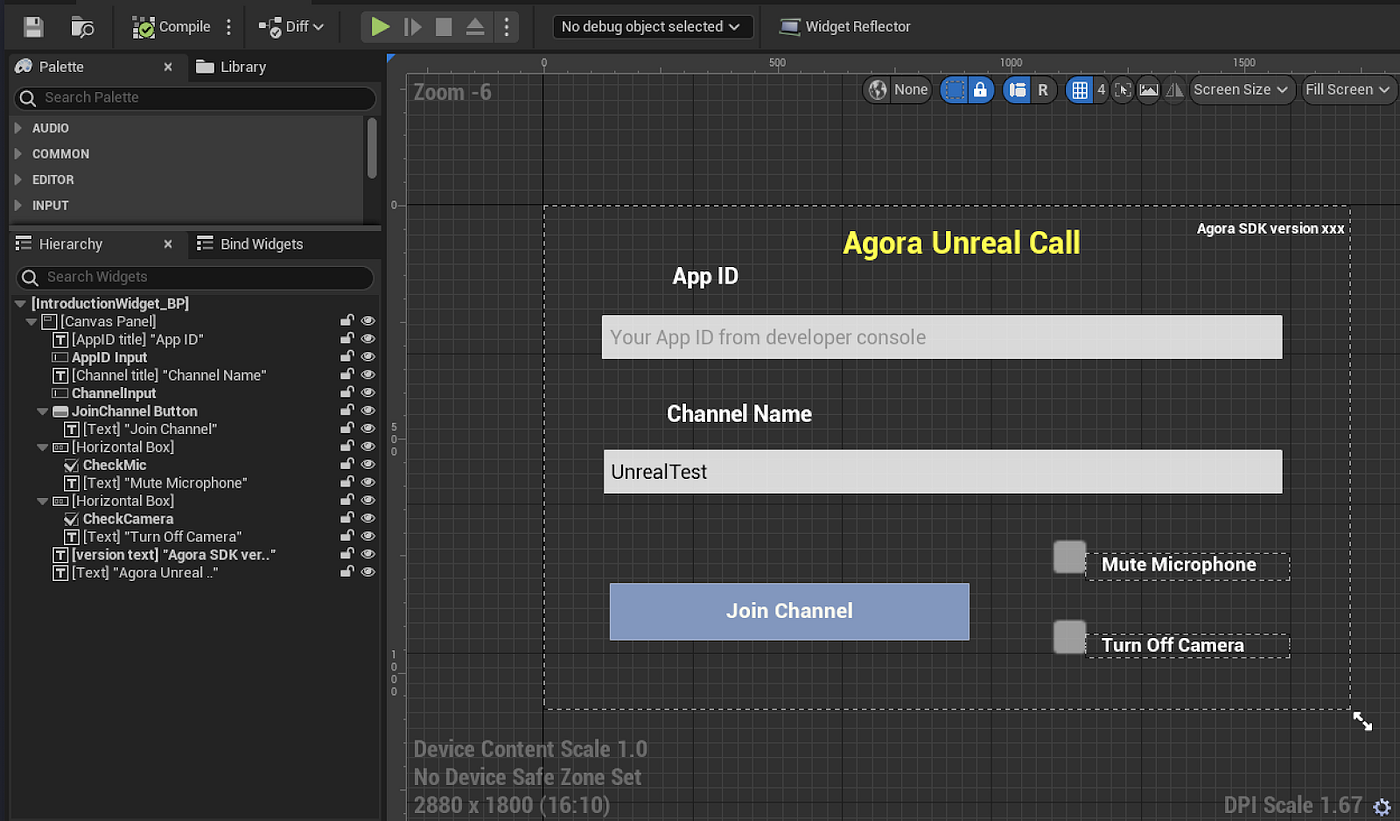
From the basic project, we will use an Introduction widget and a VideoCall widget with the following design. Note that we don’t include a Blueprint graph in these widgets.
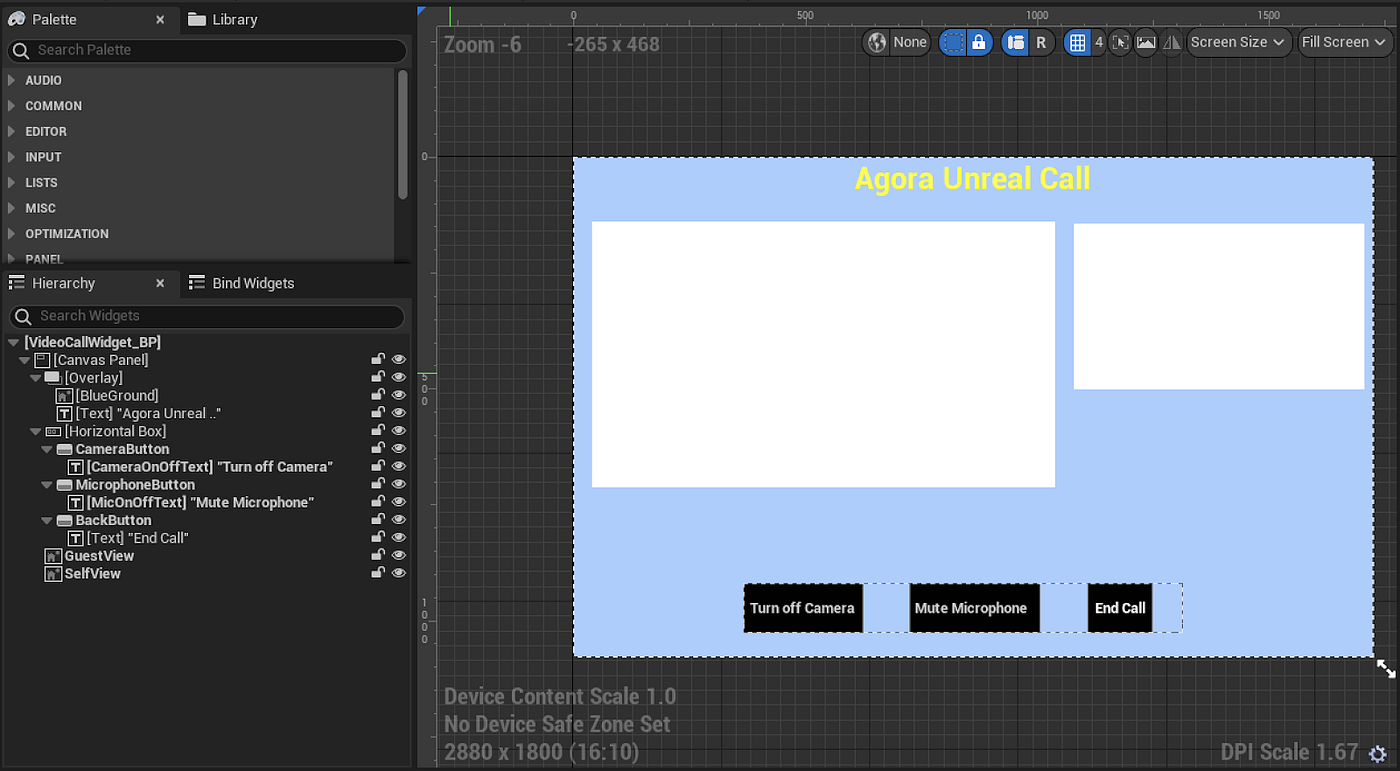
It is a design choice that the GuestView is presented as the bigger image display box in the VideoCall widget and the SelfView as the smaller box.
We will use an empty Level GameLevel in the basic project setup. Save everything and quit the Unreal Editor for now.
Installation
- Download the plug-in here if you haven’t done so already.
- Copy the plug-in to [your_project]/Plugins. Your project should look like [project_name]/Plugins/AgoraPlugin.
- Add plug-in dependency into the [your_project]/Source/[project_name]/[project_name].Build.cs file. The Dependencies section should include the following settings:
- Open the project again and recompile the added module when prompted.
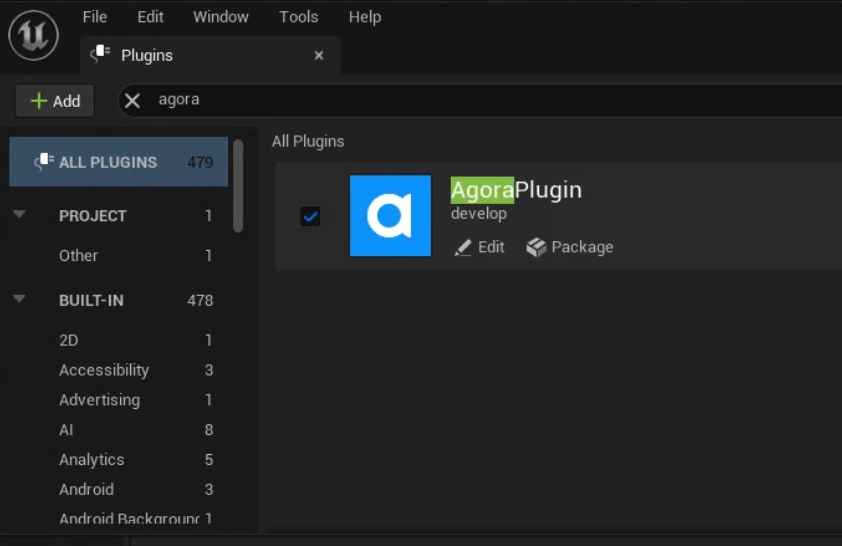
- Go to Edit > Plugins.
- Find the Project > Other category and make sure that AgoraPlugin is enabled.
Create Game Mode
Game Mode will be used to switch between widgets. Create a new folder under Content and name it Blueprints directory. Right-click to create a new class with GameMode as its parent class:
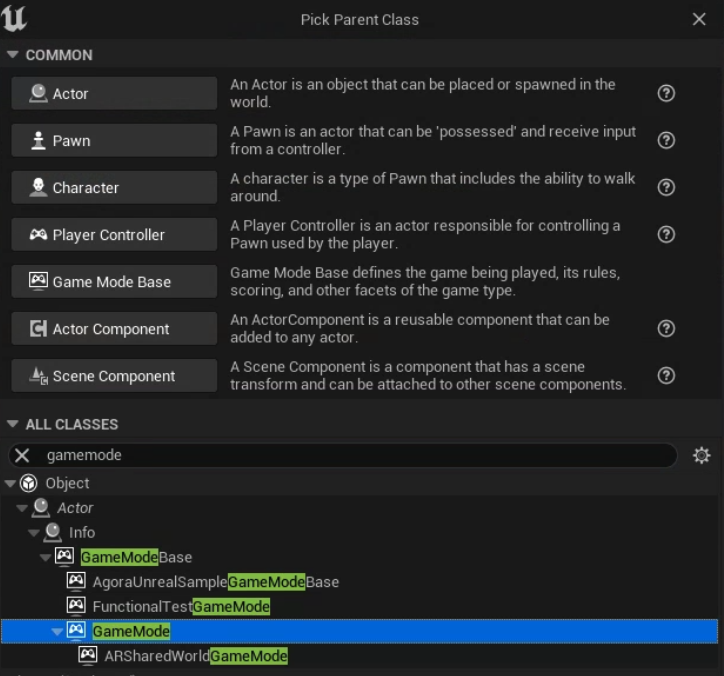
Name this new class GameMode_BP.

Implement Game Mode
Go back to GameMode_BP and add two functions by clicking + in front of the Functions section. Name them SetIntroductionView and SetVideoCallView. Add two variables, called IntroductionWidget_BP and VideoCallWidget_BP, and change the types of these variables to Introduction Widget BP and Video Call Widget BP, respectively:
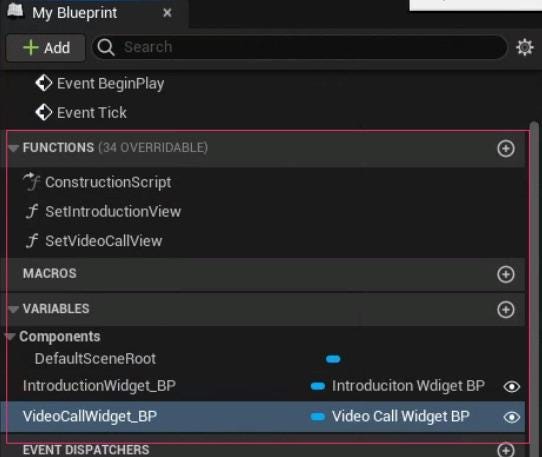
Implement functions as shown:


Next, go to Edit > Project Settings and update the Project Maps and Modes with the new classes:
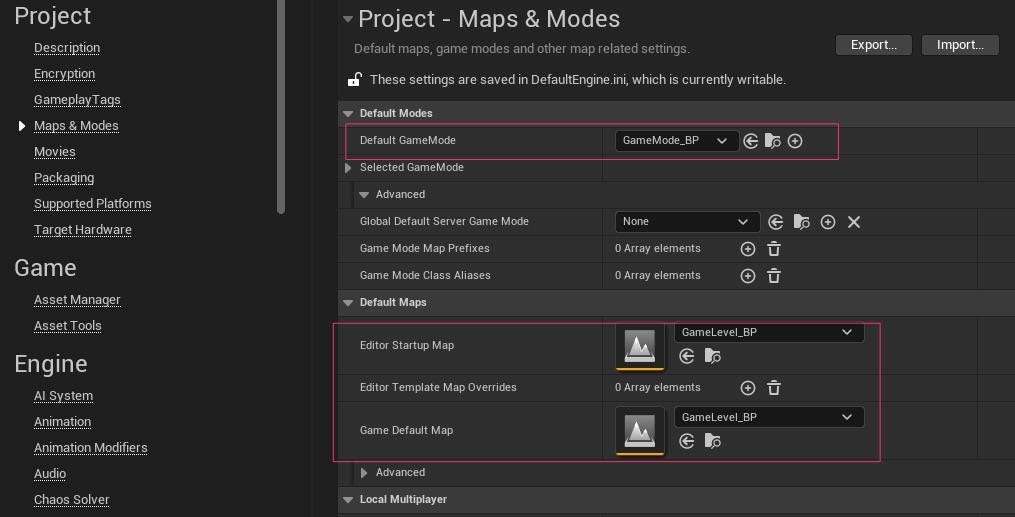
Implement the Life Cycle of GameLevel
The GameLevel will consist of the life cycle of the AgoraRtcEngine and the logics of event handling. At the top level, we will need to implement the Begin Play and End Play event for the level.
Begin Play
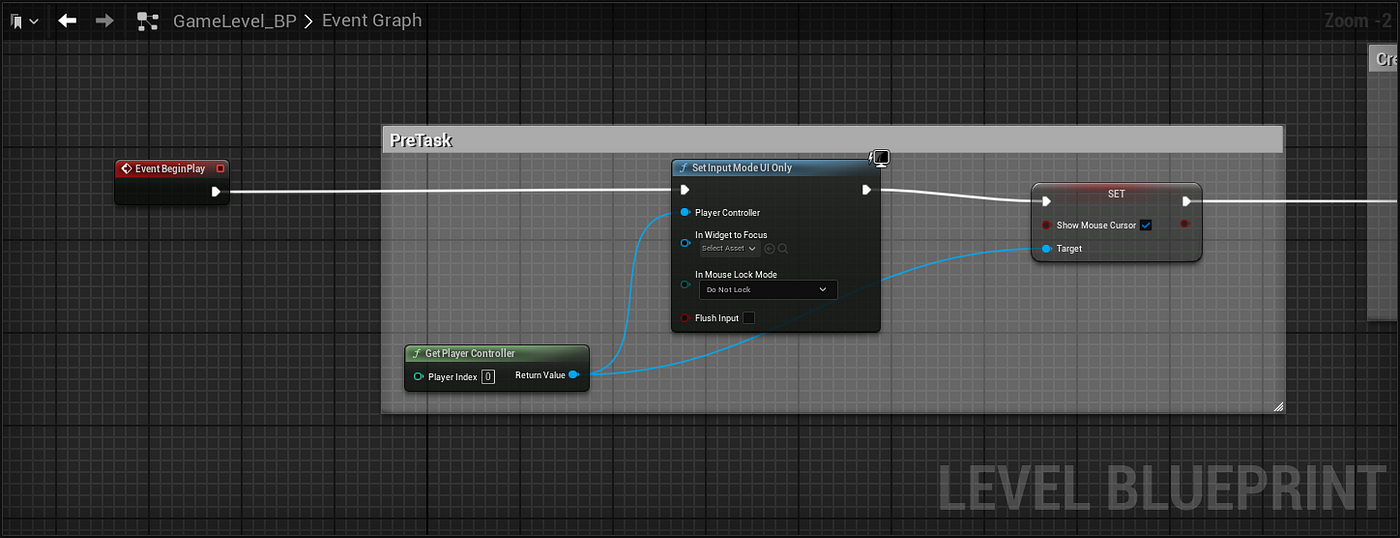
There are four main parts of the actions that occur during the Begin Play event:
- Pretask (figure 10): Set up the mouse cursor. Use the Unreal Engine built-in function SetInputModeUIOnly to make sure the mouse cursor is visible for the UI control.
- Create RTC Engine Instance (figure 11): Cast the GameMode instance to our GameMode_EP class and promote it to variable. Then construct an instance of the AgoraRtcEngine and promote it to variable RtcEngine and make a copy in the GameMode_EP instance. Next, construct an instance of IRtcEngineEvent Handler and promote it to a variable EventHandler. Create a function BindAgoraEvent for this level Blueprint. Call this function after creating the EventHandler variable. We will implement the BindAgoraEvent function later.
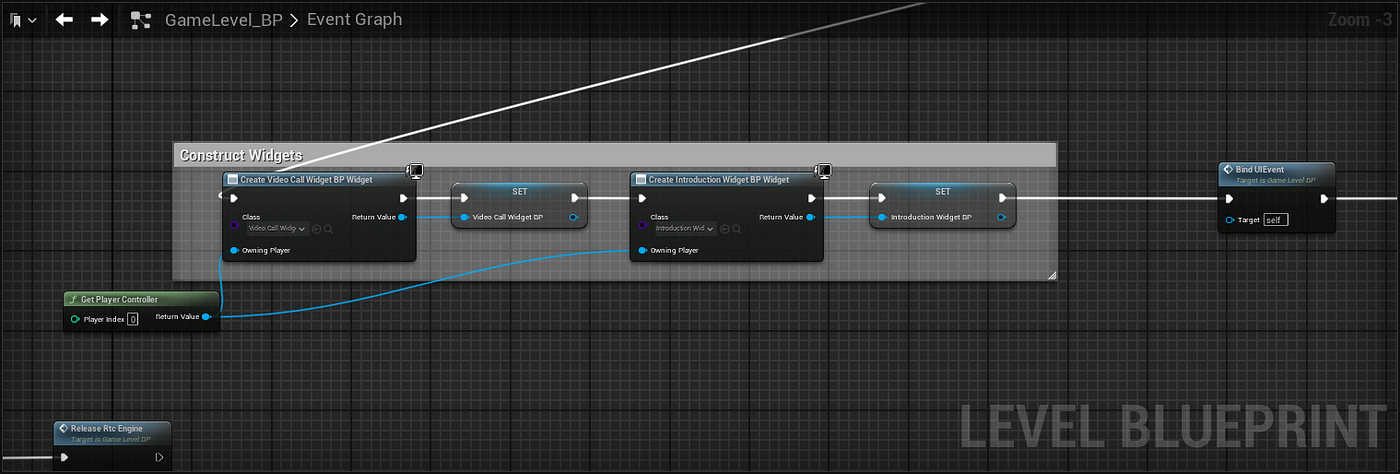
- Construct Widgets (figure 12): Construct the IntroductionWidget_BP and VideoCallWidget_BP and save them to the GameMode_EP instance. Create a function BindUIEvent and connect to this as a node. We will implement the BinUIEvent function later.
- GameMode Set (figure 13): Save the two widget references to the GameMode instance and add IntroductionWidget_BP to viewport. This will show the UI from the Introduction widget when the game is run. Create a function SetAgoraVersionText as the last step for the event. See figure 14 for its implementation.


Version Printing
Implement the SetAgoraVersiontext function by calling the GetVersion function from the RtcEngine instance. Append the returned value to the string “Agora SDK Version:” and set the text in the Introduction widget BP.

End Play
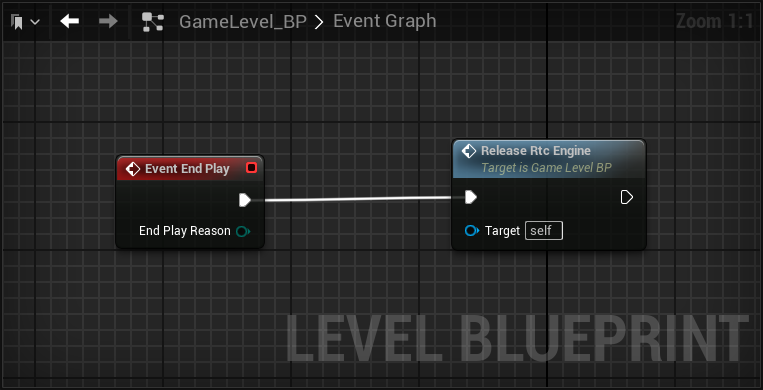
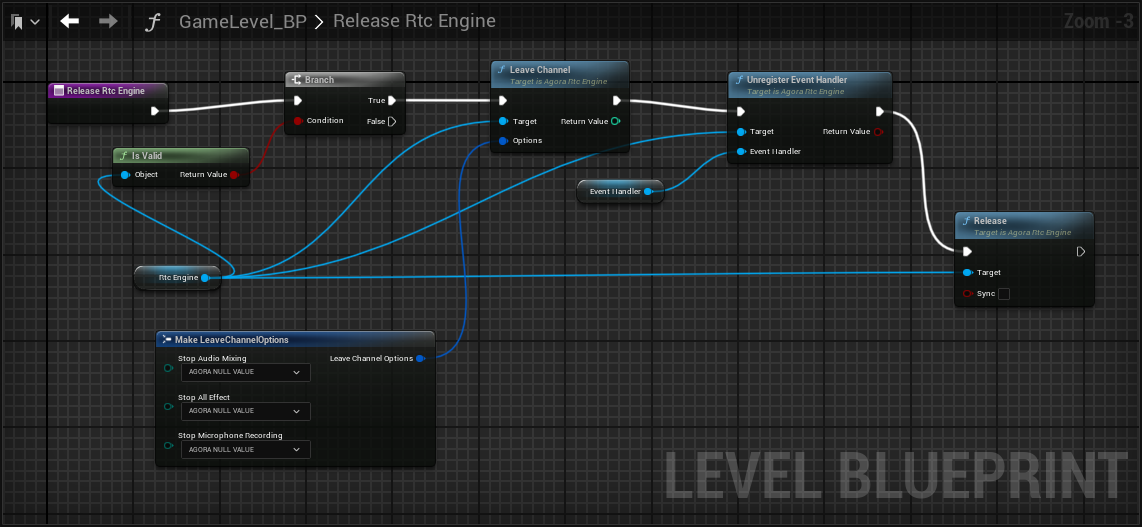
At the end of the game play, the Agora RTC engine should be released. If this is not done properly, a game crash might happen if you play the game in the Unreal Editor again. The event call will simply call a function ReleaseRtcEngine, which is implemented in figure 16.
Checkpoint 1
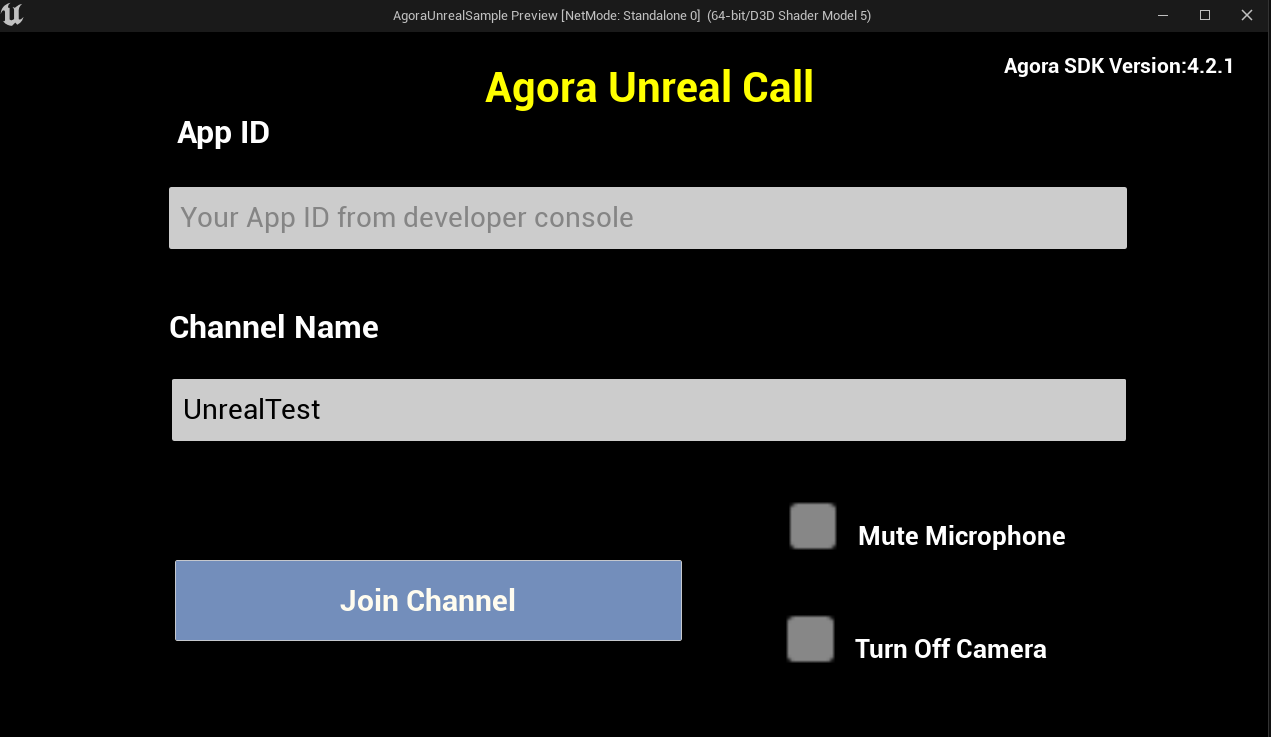
Make sure the Blueprints compile. Then click the Play button to run the project. You should see the following screen with the Agora engine’s SDK version number printed in the top-right corner:
Implement Agora Callbacks
We will take care of the BindAgoraEvents function by providing the implementation of various callback handlers for Agora events. First drag the EventHandler variable to the Blueprint editor canvas. From the EventHandler outlet, bind the event to OnJoinChannelSuccess. Drag the input outlet Event to create an Event. Select Function > Create Matching Function. See figure 17.
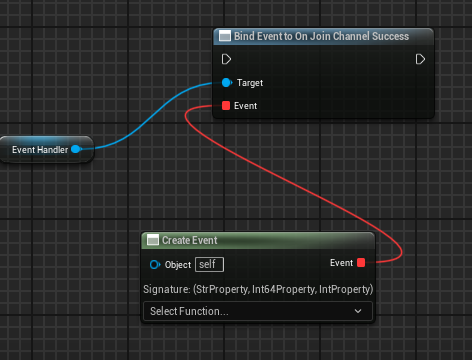
We will provide the body of the function later. Now we add more events to bind in this Blueprint graph using the same steps. For this demo, we will implement only the following four events:
- OnJoinChannelSuccess
- OnUserJoined
- OnUserOffline
- OnLeaveChannel
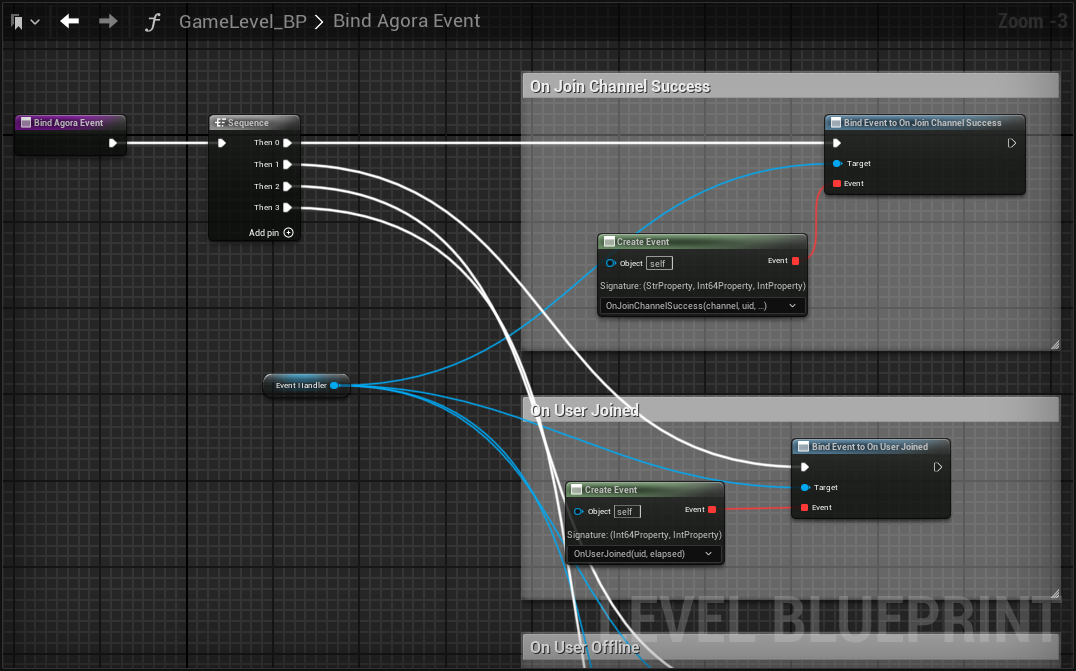
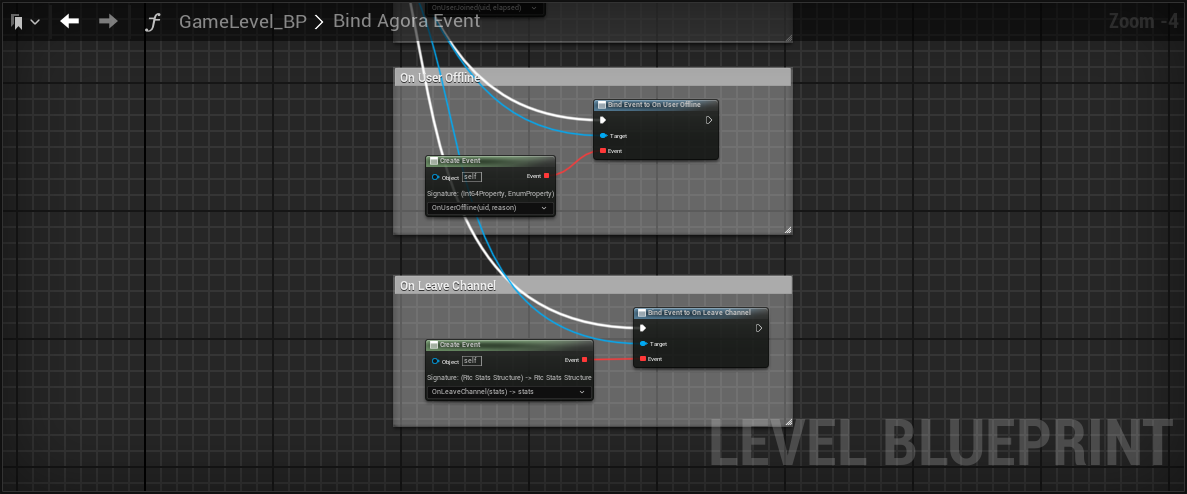
OnJoinChannelSuccess
This event is triggered when a local user joins the channel successfully. We will perform the following actions:
- (Optional) Print the message to screen.
- Switch the UI widget to VideoCall (function SetVideoCallView; see figure 8).
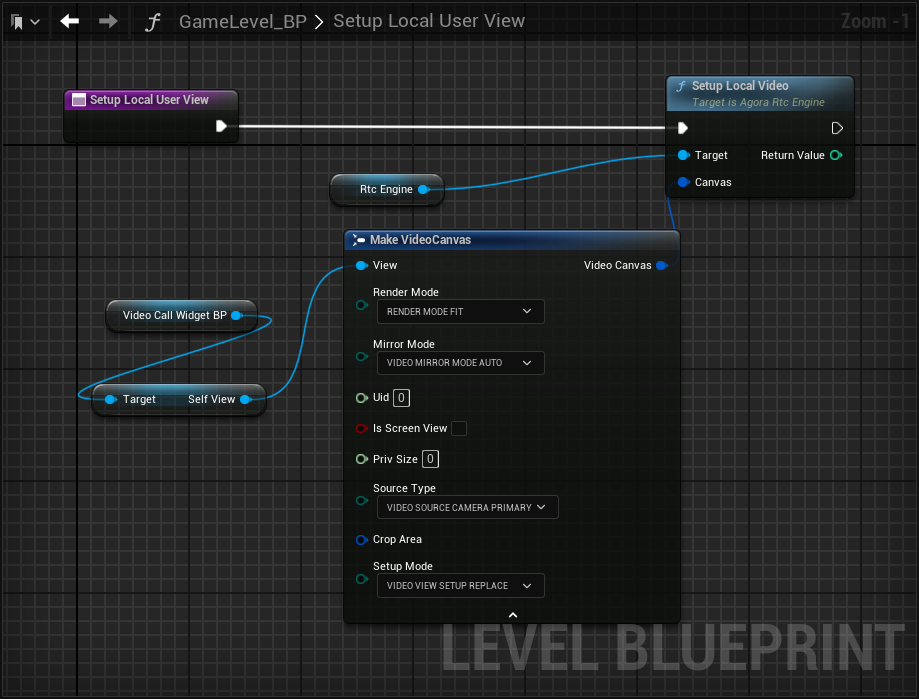
- Render the webcam video stream to the SelfView image box (function SetupLocalUserView; see figure 21).
- In case the user turns off the webcam for the session before joining, display the default image in the SelfView (function CleanupLocalUserView; see figure 22).

SetupLocalUserView
This function calls the SetupLocalVideo utility function from the RtcEngine instance. The Canvas input is provided by making a VideoCanvas instance, which takes VideoCallWidget’s SelfView object as the view renderer.
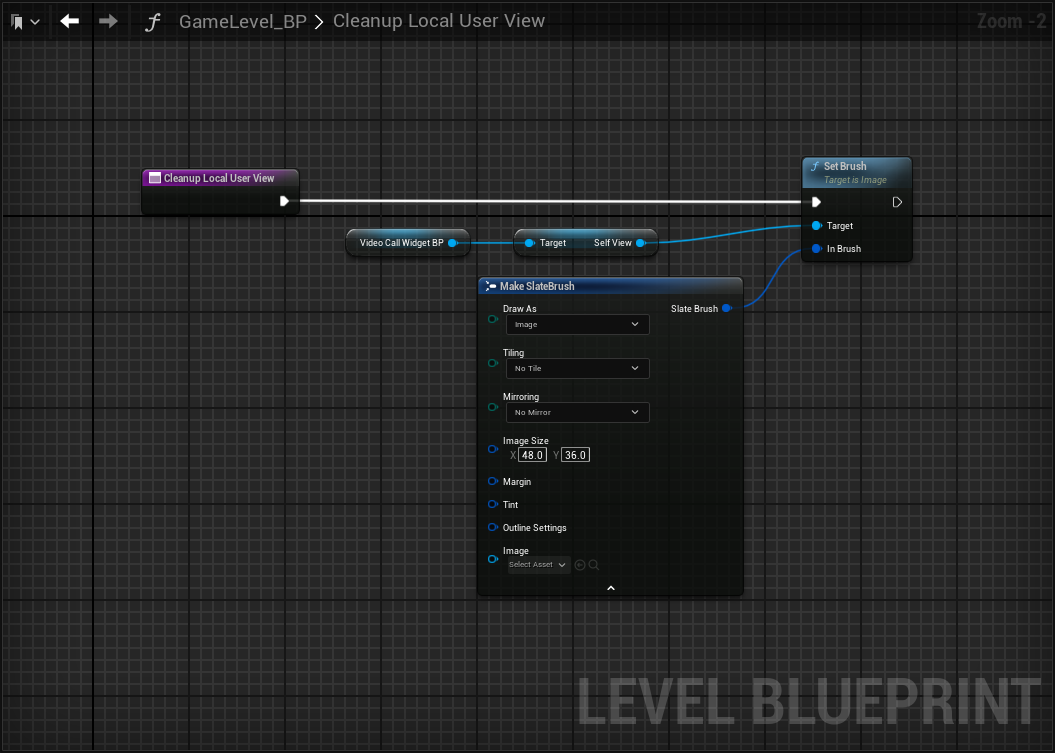
CleanupLocalUserView
This function clears the view by reassigning the slate brush for the SelfView image object.
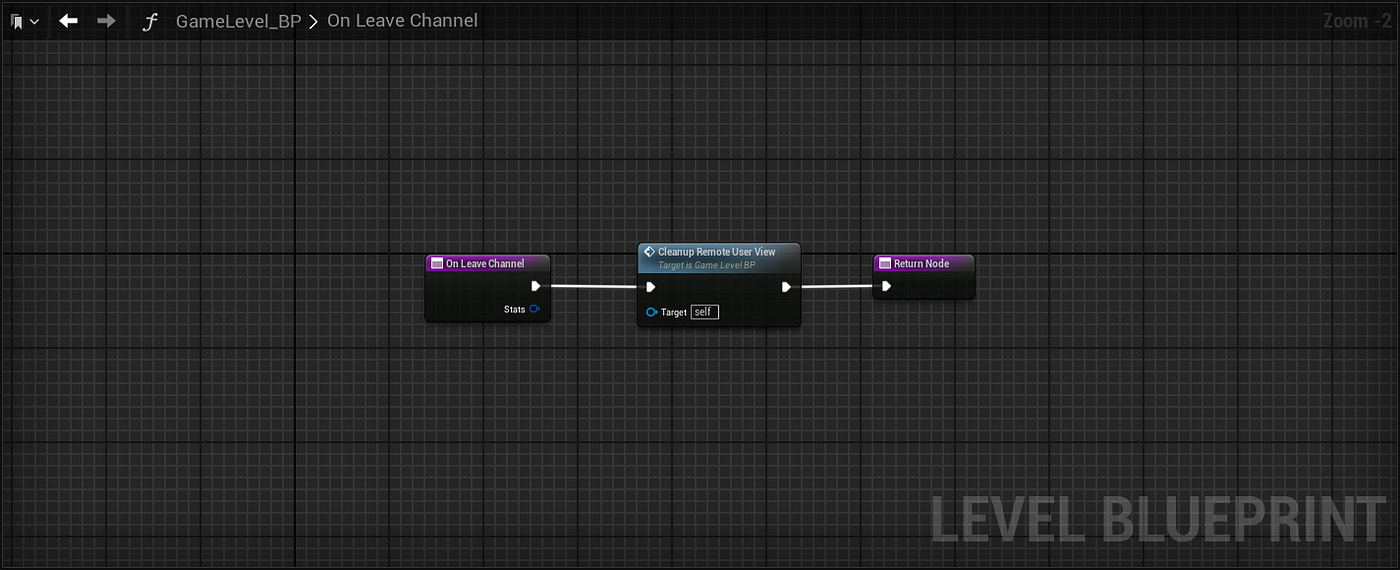
OnLeaveChannel
This event is triggered when a local user leaves the channel. The corresponding logic is to clean up the views. Since the SelfView is cleaned every time a user joins the channel, we clean only the remote user’s view for this call.
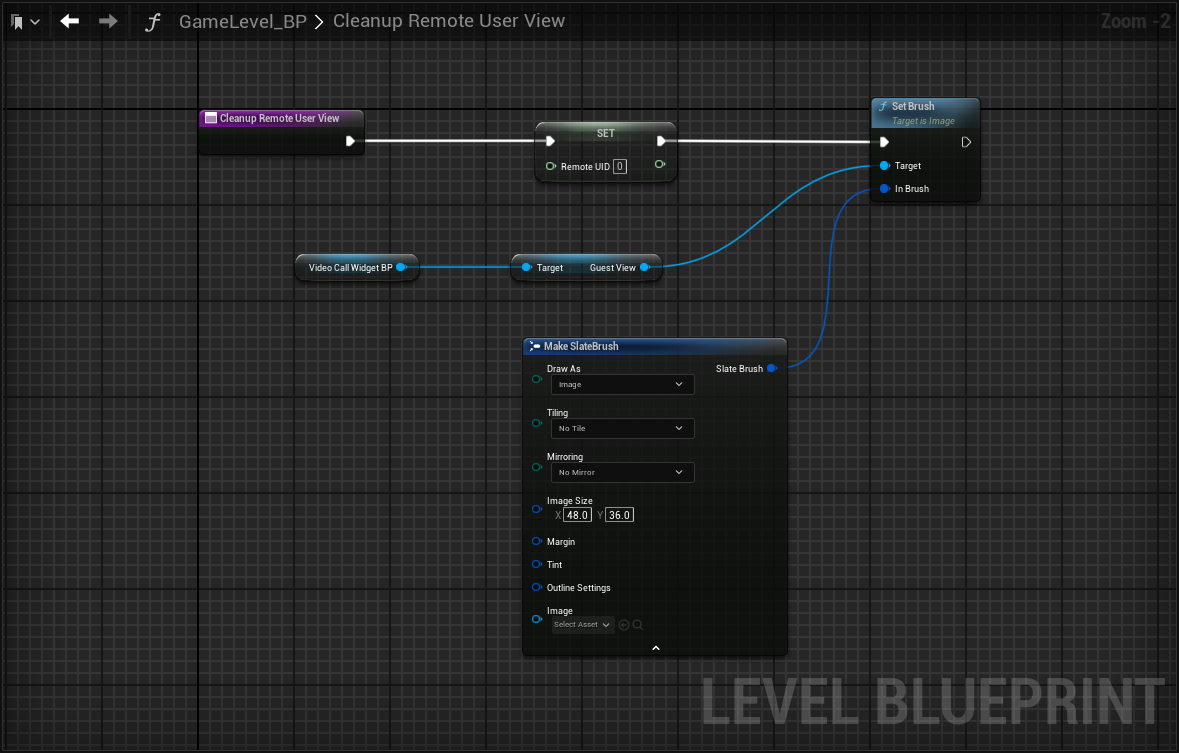
CleanupRemoteUserView
This function is very similar to CleanupLocalUserView. The GuestView of the VideoCall widget is reset here.
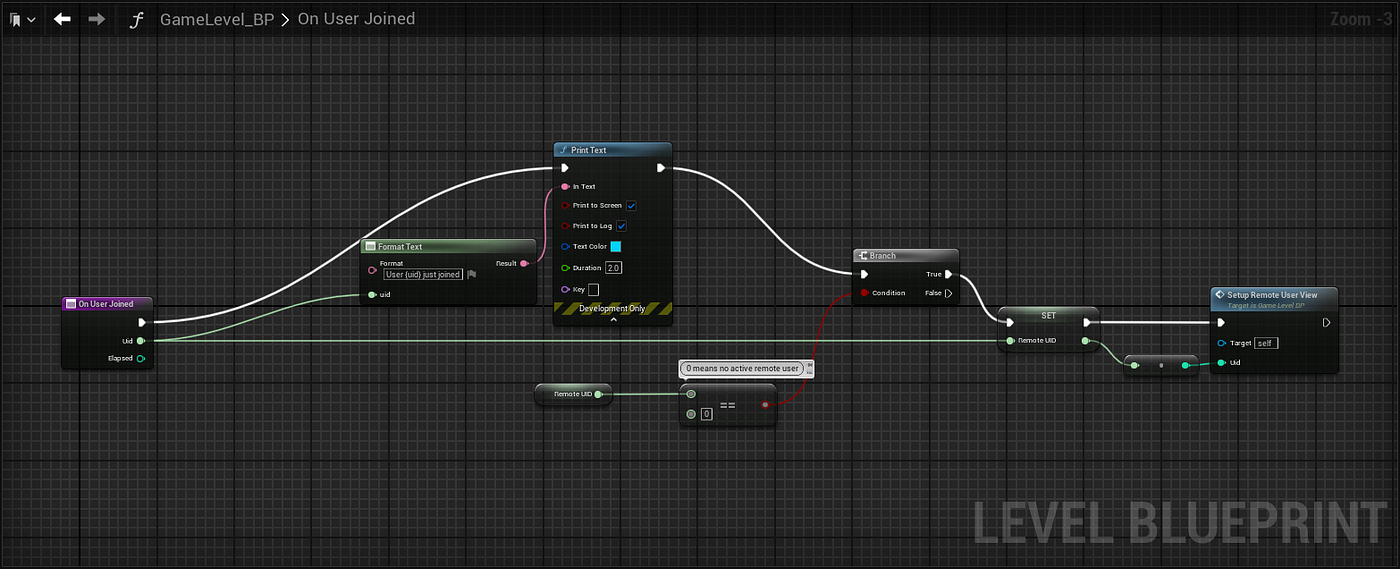
OnUserJoined
This event triggers whenever a remote user joins the channel. For this demo, we do not handle more than one remote user in the call. We define a variable RemoteUID to remember the remote user that is in the call. A value of 0 is given if no one is in the call. We will render the incoming video stream (function SetupRemoteUserView) only if RemoteUID was 0.
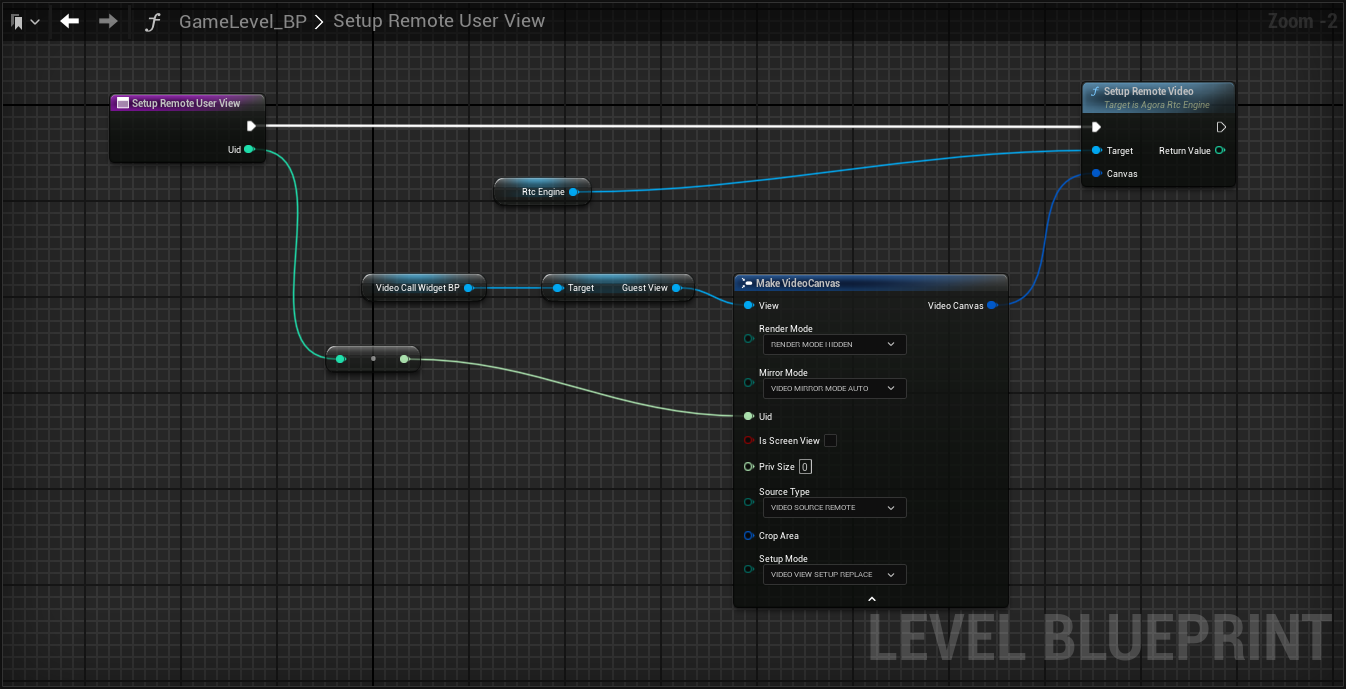
SetupRemoteUserView
This function takes the remote user’s UID and passes it to the RtcEngine’s utility function SetupRemoteView for rendering the incoming remote video stream on the GuestView object.
OnUserOffline
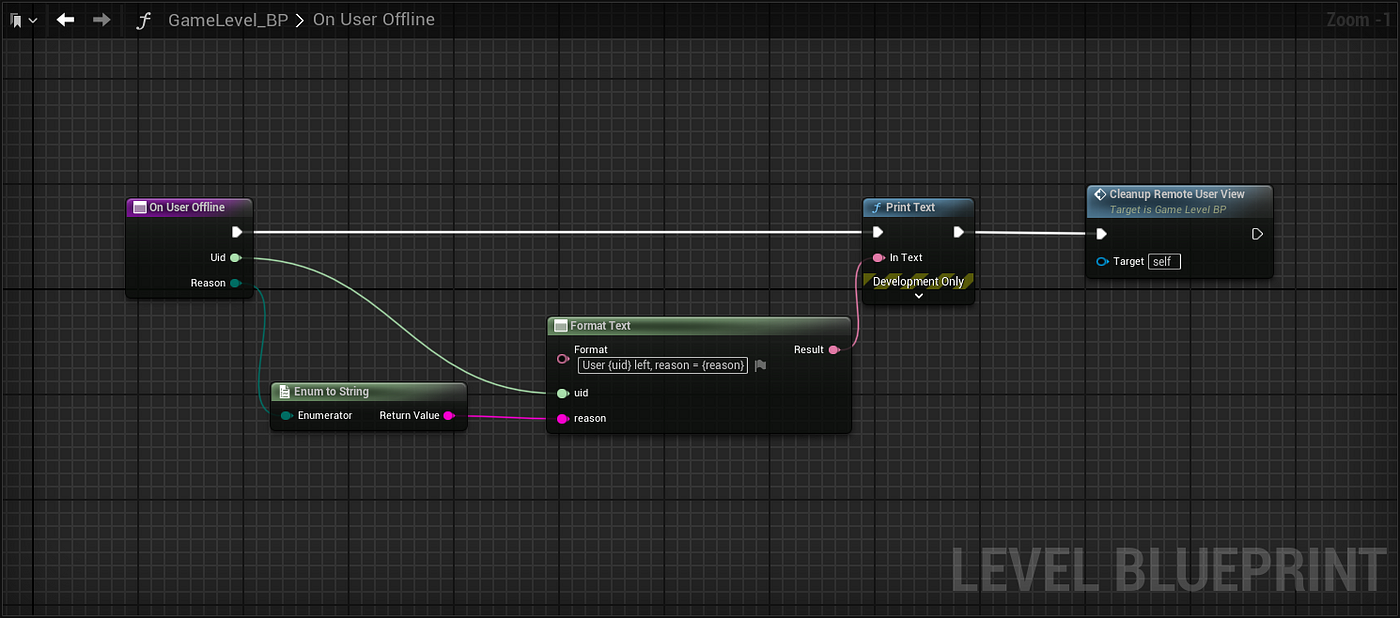
When the remote user goes offline, the rendering will stop, and the GuestView is reset by calling CleanupRemoteUserView (see figure 24).
Complete the Agora Life Cycles
The real RTC session starts when the Join button is clicked on the Introduction widget interface. Let’s go through the details of implementation.
OnJoinButtonClicked
This event is bound at the BindUIEvent call that we mentioned earlier. We must consider several steps before finally calling the RtcEngines JoinChannel function:
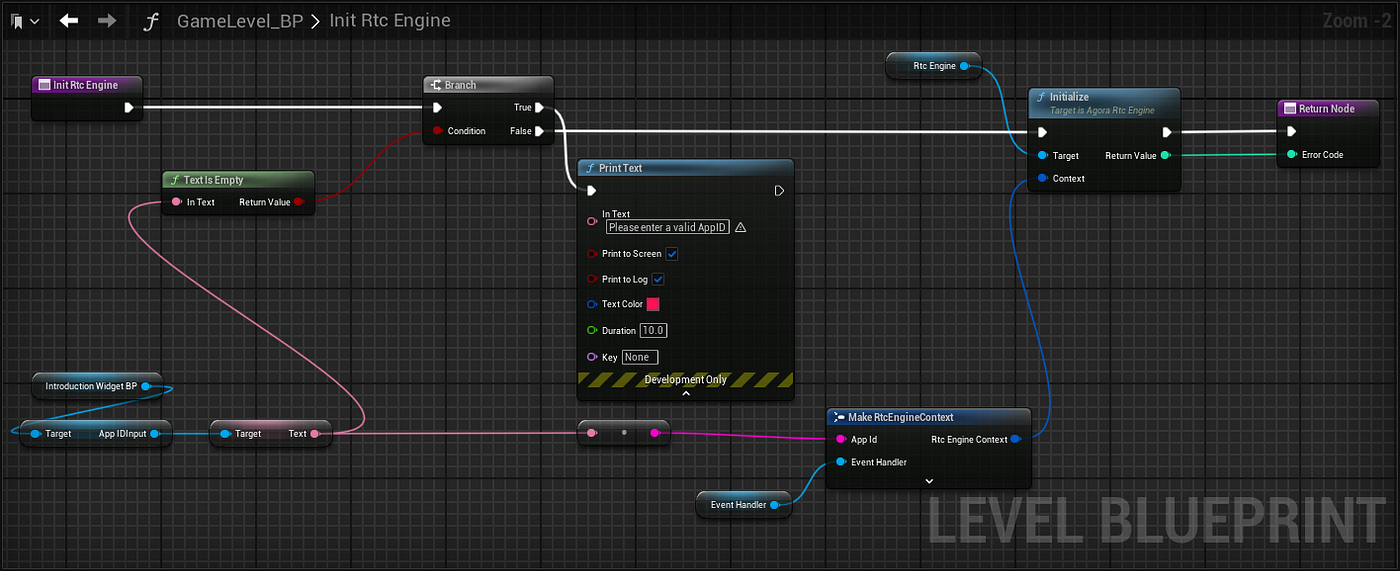
- Initialize the RTC engine (see function InitRtcEngine).
- Enable video and audio.
- Update the MediaOption flag that is associated with the local user’s camera and microphone settings (see function UpdateMediaOptionFlags).
- Grab the channel name from the UI text field and use it for the JoinChannel call.


InitRtcEngine
UpdateMediaOptionFlag
On the Introduction widget, we defined two checkboxes: CameraCheck and MicrophoneCheck. They allow the local user to turn off their camera and microphone input. The value of these options passes to the MediaOptions flag for the JoinChannel call. This function allows the translation of the logic from the UI. Note that the function does not take true/false values directly. It requires a custom type AgoraOptional as the input. And so we use variables CameraPublishEnum and MicPublishEnum to store the translated values.


Checkpoint 2
Click the Play button to compile and run the project. When you click the Join button, an error message should be printed to the screen saying, “please enter a valid app id.” This verifies the error case for missing App IDs. Enter the App ID that you generated from your Agora developer console. In this test setup, we will use test-mode App IDs. You should now see yourself as the local user joining the channel and appear in the SelfView display box. Use another client to join as the remote user. We recommend using Agora’s web demo client for this test. You should see that the call is now working, just as we showed at the beginning of this blog. But we are not done yet. Wewill want to finish the implementation of the VideoCall widget.
Implement the VideoCall Widget
We will include the logic during the call in this widget Blueprint. It is important that users can choose to mute or unmute themselves during the call, as well as choose to hang up without closing the app. The three buttons on the VideoCall widget serve these purposes.
First, we will save the reference to the GameMode_BP instance and then initialize the buttons.

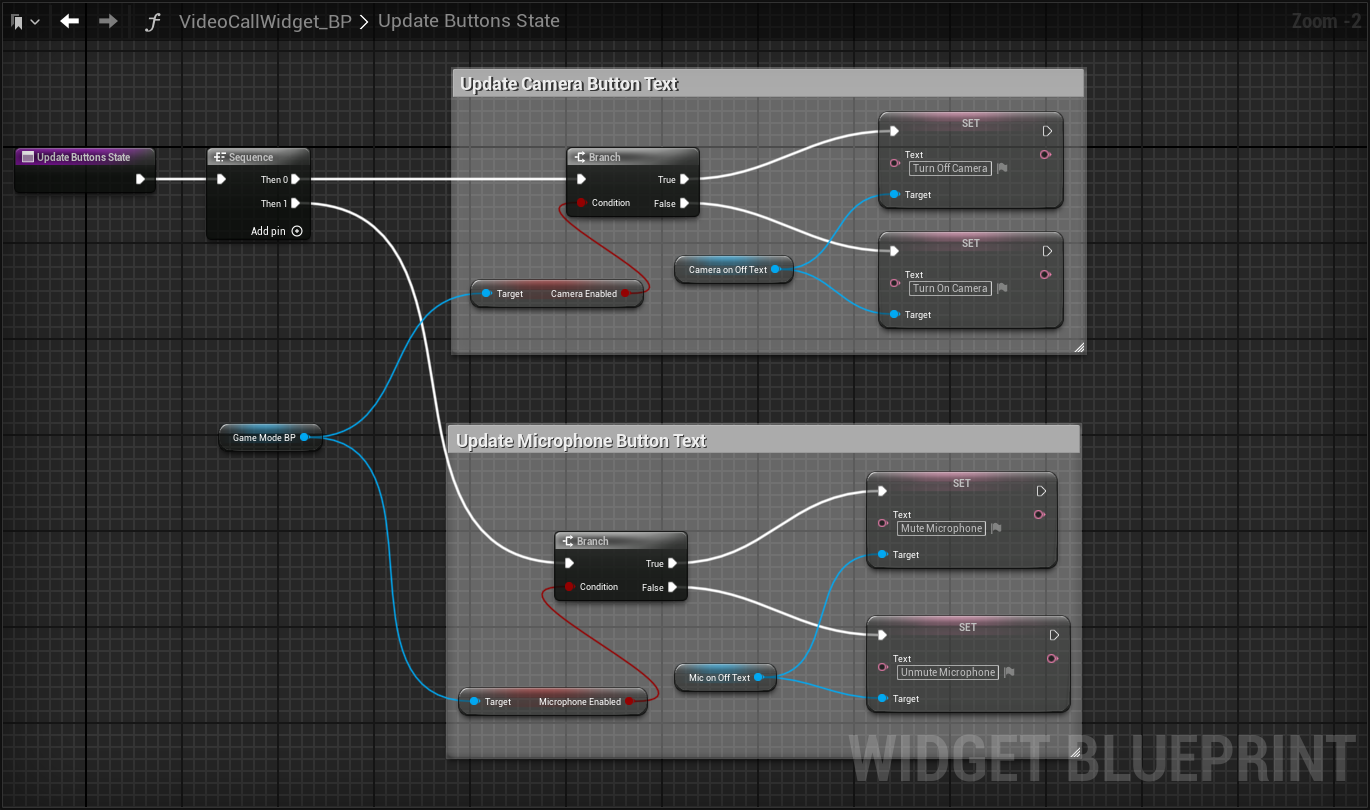
UpdateButtonState
We’ll use the Boolean variables CameraEnabled and MicrophoneEnabled that were saved earlier in the JoinChannel call to update the text on the buttons.
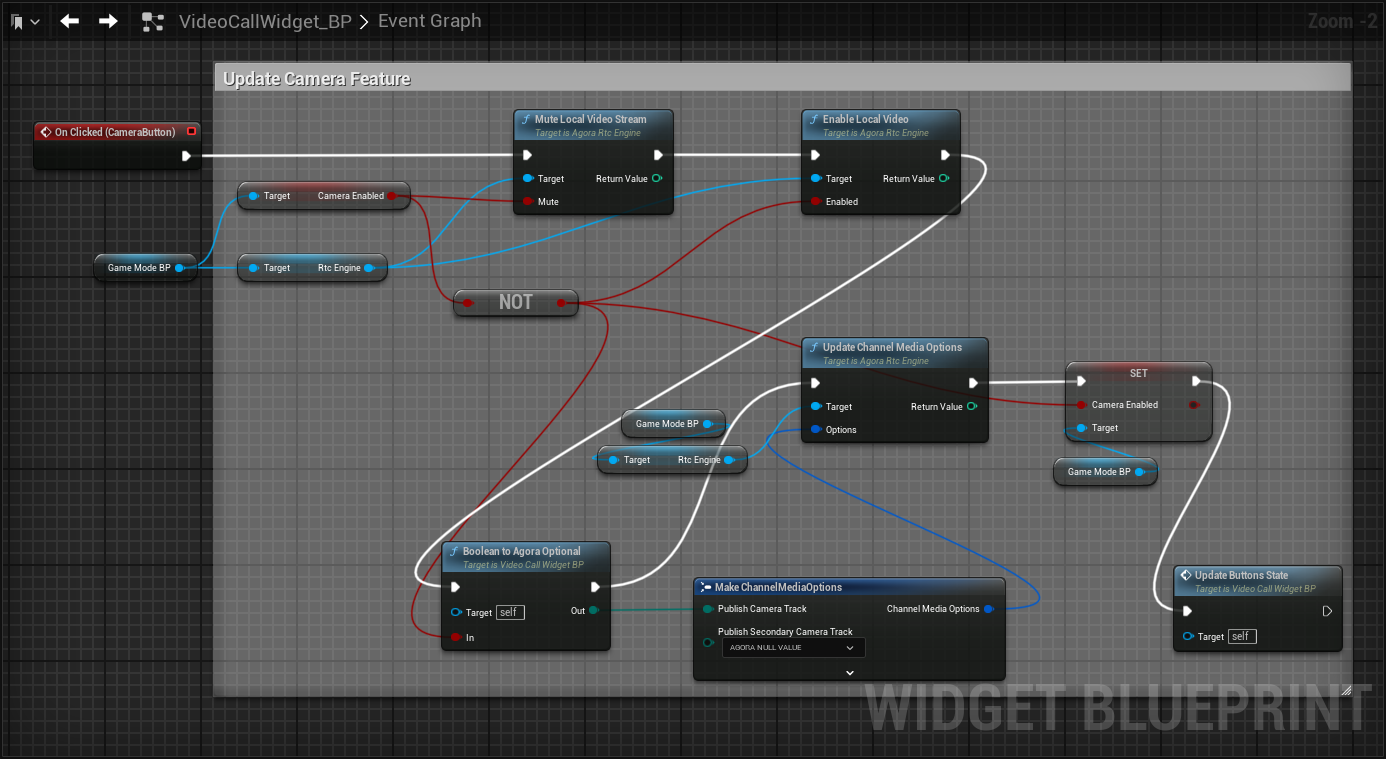
OnClicked (CameraButton)
Three Agora APIs are called to handle different switches of the video feature:
- MuteLocalVideoStream: The outgoing video stream is discontinued, although your camera can still be turned on.
- EnableLocalVideo: The switch to turn the local camera on and off.
- PublishVideoTrack (in ChannelMediaOptions): This determines whether the camera can be used or not during the call. If this is set to false when joining the channel, then calling EnableLocalVideo or MuteLocalVideoStream will not turn on the camera and publish the video stream. You’ll need to call UpdateMediaOption to unmute yourself for your local video to be captured and published.
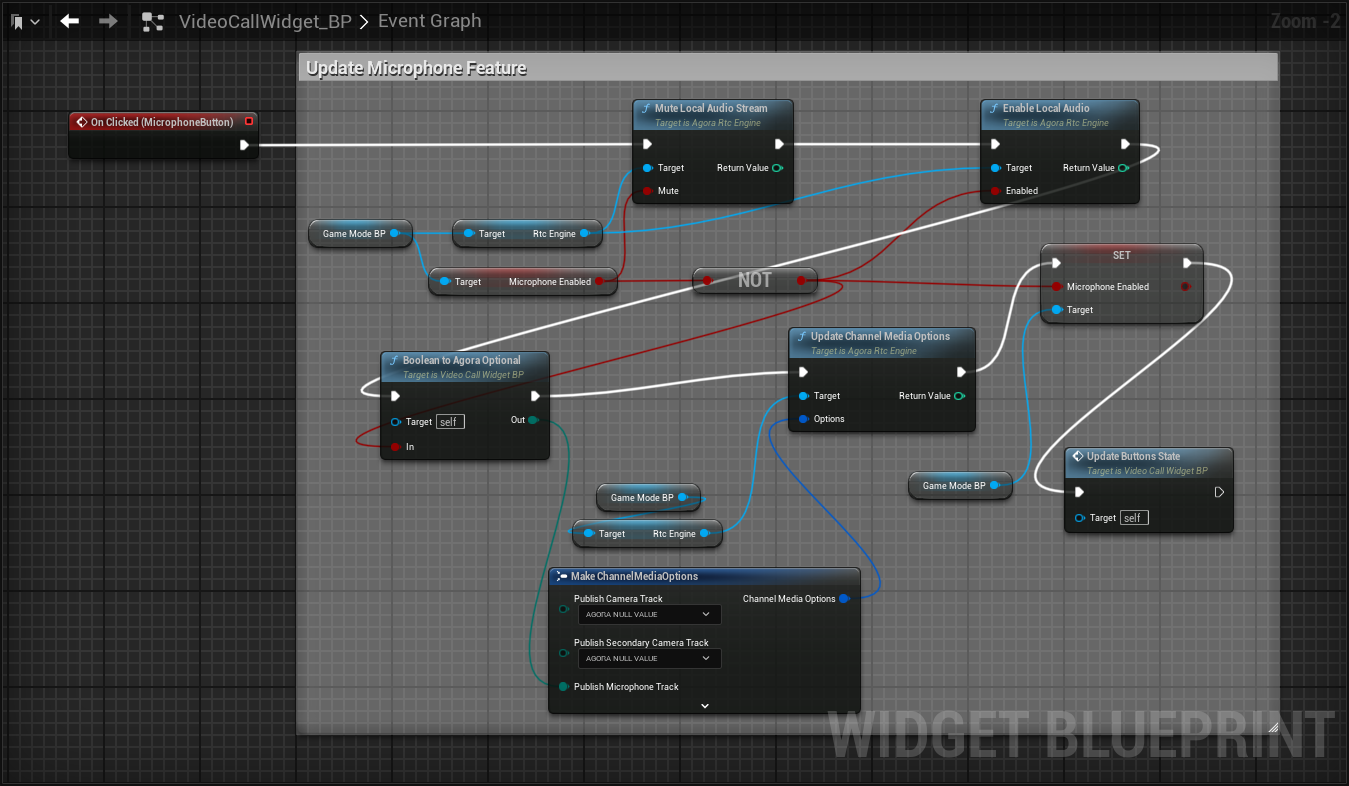
OnClick (MicrophoneButton)
Similar to the Camera button, the Microphone button employs the three microphone inputs and uses a similar Blueprint graph:
- MuteLocalAudioStream: The outgoing video stream is discontinued, although your camera can still be turned on.
- EnableLocalAudio: The switch to turn the local microphone on and off.
- PublishMicrophoneTrack (in ChannelMediaOptions): Similar to the description of PublishCameraTrack.
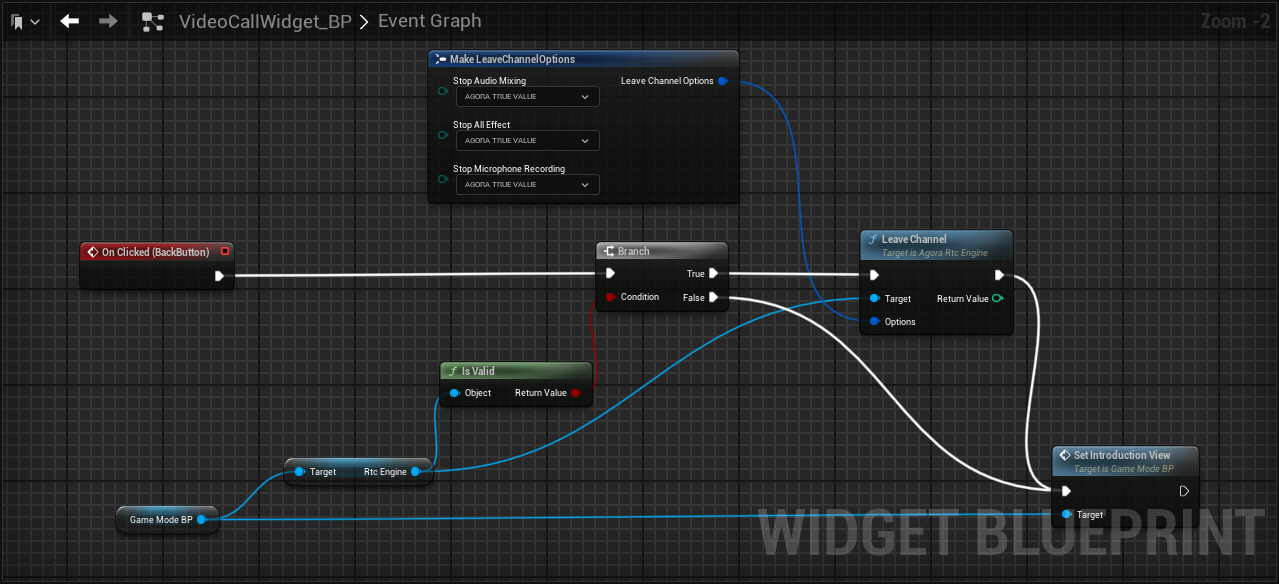
OnClicked (BackButton)
The Back button takes the user interface back to the first screen (the Introduction widget view). It ends the call session by leaving the Agora channel.
Checkpoint 3
The demo is now finished. Verify that the mute buttons are working properly and see if you can go back to the Introduction screen and rejoin the channel. Well done!
Conclusion
The simple demo consists of a few steps in the UI implementation and integration with the APIs that Agora provides. It is fun to connect to people in a Unreal Engine application via a video call. For packaging a build for deployment, please see this GitHub Readme file for the latest information on packaging the game with the Agora Unreal SDK. This finished demo can be accessed from the repo by going to the AgoraBlog branch. Any comments and questions can be raised at the GitHub page too. Thank you for reading!


