Flutter Video Call: Add Video Chat to Your App using Agora
This blog was written by Meherdeep Thakur, an Agora Superstar. The Agora Superstar program empowers developers around the world to share their passion and technical expertise, and create innovative real-time communications apps and projects using Agora’s customizable SDKs. Think you’ve got what it takes to be an Agora Superstar? Apply here.
How do you ensure that your customers are happy with your service? How can you provide a better way to engage with your team, so that productivity is never compromised? If these are questions that have crossed your mind, then you’ll be pleased to know that I have an answer for you and that answer is really simple: Real Time Engagement (RTE). So what does RTE mean and how can it help your business?
In today’s digital economy everyone is connected with each other virtually and it bridges the distance between two distant users. Your company can be based in the North Pole but it shouldn’t stop you from reaching out to the users in the other corners of the world. RTE ensures that you’re always connected to the people that matter to you and your business. It comes without saying that in today’s world, RTE has a great impact on every field like education, politics, social media, art, and science.
Building your own RTE software can be a little troublesome: maintaining a server, load-balancing and at the same time providing low-latency can make even the best go nuts.

So how can you add RTE to your Flutter Android or iOS application without losing your mind and your time? Answer: Agora’s RTE SDK. In this tutorial we’ll learn how to add group calling functionality to your Flutter app.
How Do I Start?
Before we start making our Flutter video call app let’s make sure that we have all the required things:
- Flutter SDK for video calling in Flutter: Quite obvious isn’t it?
- Agora’s developer account: To build an app that is using Agora’s SDK you will need an AppID. So to grab your own AppID go to https://console.agora.io/ and quickly create an account and log in to your dashboard.
- Now navigate to the project management tab and click on the create button. This will let you give a suitable name for your project and give you an AppID linked with it.
Let’s Get Going!
Now that we have all the things that we need, let’s make a simple group video calling app. We first need to start with creating a new Flutter project:
flutter create agora_video_callImport Packages
Jump to pubspec.yaml file and under dependencies add agora_rtc_engine package available over here.
Next we will add permission_handler to get the permission of microphone and camera features that will be used during video calls.
After adding all these packages in your pubspec.yaml run the command below from your project’s directory to get the packages:
flutter pub getCode Structure
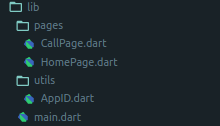
This would be the structure of the lib folder that we are developing:
To start development, let’s just remove the default counter code from main.dart such that our dart file looks something like:
For our Flutter video chat app home page, we will be building a form that takes the channel name as an input. So let’s jump to HomePage.dart in the pages folder.
So we have successfully made a form that takes the channel name as input. Now we need to create a logic for that join button such that it passes the instructions to the CallPage.dart and also asks for users’ microphone and camera permission.
Now, before we actually start with building our Flutter video call screen let’s just keep our AppID separate in utils.dart under the settings folder.
Building the Call Screen
Finally! After all the setup and permission handling, we have everything that we will be needing to build our CallPage.dart. Let’s just declare some variables that will be used to manage the state of the call.
- The list
_users[]contains the uid of the users who join a particular channel. - We will use
_infoStrings[]to store the logs of the call. - We will use
mutedto save the state of the microphone. We will be using it to disable and enable the microphone.
Once we have created all the variables, we can go ahead and create an initState() to initialize our AgoraRtcEngine through which we can call the APIs provided by Agora.
_initAgoraRtcEngine()initializes the AgoraRtcEngine and links your app to Agora’s engine using AppID.
_addAgoraEventHandlers()is a function that we will be using to add event handlers to our code so that we can build our call logs and get the uid of people as they join.
AgoraRtcEngine.enableWebSdkInteroperability(true)enables interoperability between a mobile device and a web browser or app.AgoraRtcEngine.joinChannel(null, widget.channelName, null, 0)allows a user to join a channel. Here you can pass optional parameters such as token (used for authentication) or additional information about the channel.
Now it’s time to build the UI for our Flutter video call. As an example, I will be going with a grid view for this group call.
_viewRows()widget is used here to provide that stack view._panel()Flutter chat widget simply prints the channel logs._toolbar()provides interactive options like muting the microphone, switching cameras, and ending the call.
Before we build that grid we will need a list of users in the call so that our app can auto adjust the screen ratio for each user.
Using this list let’s define the view:
- View for a single user
Using this list let’s define the view:
- View for multiple users
Now that we have defined our view for users in our group call, let’s put this inside the _viewRows() widget to form the grid.
Here we built cases based on the number of people in the call so we can align our grid accordingly.
Well, we are done with our grid. Now let’s quickly define the _toolbar to add buttons for muting the call, switching the camera, and disconnecting from the call.
- Muting the call
- Switching the camera
- Disconnecting from the call
Done!

It wasn’t that hard, was it? Now you can easily go ahead with group calling integration into your Flutter video chat app. In case you weren’t coding along or just want to see the complete code then you can refer to this GitHub repository over here.