你是否曾有这样的经历:和客户人员在电话中艰难地描述问题,或者客服人员不能清楚地传达解决方案,甚至当对方阐述的时候,你不明白自己要怎么做?
目前,大多数远程辅助都是通过音频或文字聊天完成的。这些解决方案可能会让用户感到挫败以及失望,当他们需要帮助的时候,他们可能难以描述自己的问题,也难以理解一些和解决问题有关的新概念和专业术语。
幸运的是,现在的技术已经可以通过使用视频聊天和AR轻松解决这个问题。在本指南中,我们将为你介绍构建一个利用ARKit和视频聊天创建交互式体验的iOS应用程序的所有步骤。
必要准备
1.对Swift和iOS SDK有基本和相对深入的了解
2.对ARKit和AR概念有基础的了解
3.Agora.io开发人员帐户(请参阅:如何开始使用Agora)
4.Cocoa Pods
5.硬件设备:一台带有Xcode的Mac电脑和两台iOS设备
-iphone 6S或更新版本
-ipad:第五代或更新版本
请注意:虽然不需要任何Swift/iOS相关知识,但在介绍过程中,我们不会阐述Swift/ARKit中的某些基本概念。
概述
我们将要构建的应用程序可被两个位于不同地理位置的用户使用。一个用户输入一个频道名称并创建频道,创建频道以后可以启动支持AR的后置摄像头。第二个用户输入相同的频道名称,就可以加入该频道。
当两个用户都在频道中的时候,创建频道的用户将向频道广播他已开启后置摄像头。第二个用户可以在自己设备的屏幕上绘图,此时第一个用户的界面上将会出现以AR的方式显示的触屏输入。
以下是我们将要进行的所有步骤:
1.下载并构建starter项目
2.项目结构概述
3.添加视频聊天功能
4.取得并标准化触屏数据
5.添加数据传输功能
6.在AR中显示触屏数据
7.增加“撤销”功能
启动starter项目
我为本教程创建了一个starter项目,其中包括初始UI元素和按钮以及最基本的AR和远程用户视图。
首先,从下载repo开始。下载完所有文件以后,打开项目目录的终端窗口,运行pod install以安装所有依赖项。依赖项完成安装以后,需要在Xcode xcworkspace打开AR远程支持。
项目在Xcode中打开后,我们就可以使用iOS模拟器构建并运行项目。到这一步为止,项目启动应该毫无问题。

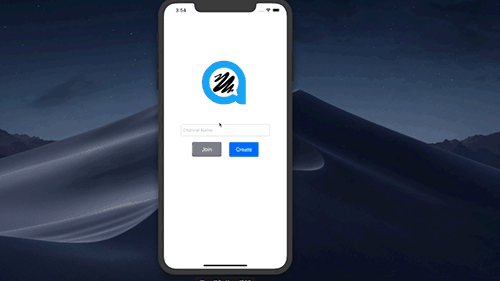
接着我们添加频道名称,单击Join和Create按钮,就可以预览我们将使用的UI。
项目结构概述
在开始编码之前,我们先浏览一下starter项目文件,以了解所有的设置。先检查依赖项,然后查看所需的文件,最后查看将要使用的自定义类。
在这个Podfile中,有两个第三方依赖项:Agora.io的实时通信SDK,它可以帮助我们构建视频聊天功能;ARVideoKit的开源渲染器,它可以让我们更方便地使用渲染AR视图作为视频源。我们需要这个屏幕外渲染器的原因是ARKit混淆了渲染的视图,所以我们需要一个框架来处理暴露渲染pixelbuffer的任务。
接着我们打开项目文件,此时AppDelegate.swift已经完成了标准设置,并完成了一个小更新。
此标准设置导入了ARVideoKit库,并且为UI界面方向掩码添加了一个委托函数来返回ARVideoKit的朝向。info.plist包括了相机和麦克风访问所需的权限。ARKit、Agora和ARVideoKit将需要这些权限。
在我们进入自定义视图控制器之前,先看看我们将使用的一些支持文件和类。GetValueFromFile允许在keys.plist中存储任何敏感的API凭证,所以我们不需要把它们编到类中。SCNVector3+Extensions.swift包括了一些对SCNVector3的扩展延伸功能,这些功能会使数学计算更简单。最后一个帮助文件是ARVideoSource,它包含了AgoraVideoSourceProtocol的适当执行,我们将使用它来传递我们渲染的AR场景,此场景将作为视频聊天中的其中一个用户的视频源。
ViewController.swift是应用程序的一个简单切入点。它允许用户输入一个频道名称,然后提供给用户2个选择:创建频道和接受远程协助;加入通道并提供远程协助。
ARSupportBroadcasterViewController.swift为接收远程帮助的用户提供功能性帮助。ViewController会将渲染的AR场景广播给其他用户,因此实现了ARSCNViewDelegate, ARSessionDelegate, RenderARDelegate,和AgoraRtcEngineDelegate。
为方便起见,我们在下文中将会把arsupportbroadcast asterviewcontroller称为broadcast astervc,把ARSupportAudienceViewController称为AudienceVC。
添加视频聊天功能
我们首先将AppID添加到keys.plist文件中。先登陆Agora Developer账户,复制App ID并粘贴十六进制到keys.plist的AppID值中。
<?xml version="1.0" encoding="UTF-8"?>

<!DOCTYPE plist PUBLIC "-//Apple//DTD PLIST 1.0//EN" "http://www.apple.com/DTDs/PropertyList-1.0.dtd">

<plist version="1.0">

<dict>

<key>AppID</key>

<string>69d5fd34f*******************5a1d</string>

</dict>

</plist>
现在我们得到了AppID集,我们将使用它在BroadcasterVC和AudienceVC的loadView函数中初始化Agora引擎。
我们设置视频配置的方法和普通方法有一些不同。在BroadcasterVC中,我们将使用一个外部的视频源,这样我们就可以在loadView中设置视频配置和的源。
override func loadView() {

    super.loadView()

    createUI()                                      // init and add the UI elements to the view

    self.view.backgroundColor = UIColor.black       // set the background color

    // Agora setup

    guard let appID = getValue(withKey: "AppID", within: "keys") else { return } // get the AppID from keys.plist

    let agoraKit = AgoraRtcEngineKit.sharedEngine(withAppId: appID, delegate: self) // - init engine

    agoraKit.setChannelProfile(.communication) // - set channel profile

    let videoConfig = AgoraVideoEncoderConfiguration(size: AgoraVideoDimension1280x720, frameRate: .fps60, bitrate: AgoraVideoBitrateStandard, orientationMode: .fixedPortrait)

    agoraKit.setVideoEncoderConfiguration(videoConfig) // - set video encoding configuration (dimensions, frame-rate, bitrate, orientation

    agoraKit.enableVideo() // - enable video

    agoraKit.setVideoSource(self.arVideoSource) // - set the video source to the custom AR source

    agoraKit.enableExternalAudioSource(withSampleRate: 44100, channelsPerFrame: 1) // - enable external audio souce (since video and audio are coming from seperate sources)

    self.agoraKit = agoraKit // set a reference to the Agora engine

}
在AudienceVC中,我们会初始化引擎并在loadView中设置频道配置文件,但视频设置需要在viewDidLoad中配置。
注意:在本教程的后半部分会介绍如何添加触屏手势功能。
我们还会在AudienceVC中设置视频配置,并在viewDidLoad中调用setupLocalVideo函数。
override func loadView() {

    super.loadView()

    createUI() // init and add the UI elements to the view

    //  TODO: setup touch gestures

    // Add Agora setup

    guard let appID = getValue(withKey: "AppID", within: "keys") else { return }  // get the AppID from keys.plist

    self.agoraKit = AgoraRtcEngineKit.sharedEngine(withAppId: appID, delegate: self) // - init engine

    self.agoraKit.setChannelProfile(.communication) // - set channel profile

}
将以下代码添加到setupLocalVideo函数
func setupLocalVideo() {

    guard let localVideoView = self.localVideoView else { return } // get a reference to the localVideo UI element

    // enable the local video stream

    self.agoraKit.enableVideo()

    // Set video encoding configuration (dimensions, frame-rate, bitrate, orientation)

    let videoConfig = AgoraVideoEncoderConfiguration(size: AgoraVideoDimension360x360, frameRate: .fps15, bitrate: AgoraVideoBitrateStandard, orientationMode: .fixedPortrait)

    self.agoraKit.setVideoEncoderConfiguration(videoConfig)

    // Set up local video view

    let videoCanvas = AgoraRtcVideoCanvas()

    videoCanvas.uid = 0

    videoCanvas.view = localVideoView

    videoCanvas.renderMode = .hidden

    // Set the local video view.

    self.agoraKit.setupLocalVideo(videoCanvas)

    // stylin - round the corners for the view

    guard let videoView = localVideoView.subviews.first else { return }

    videoView.layer.cornerRadius = 25

}
接下来,我们将从viewDidLoad进入频道。这两个视图控制器加入频道使用的是相同的函数。分别在BroadcasterVC 和 AudienceVC调用joinChannel函数内的viewDidLoad。
override func viewDidLoad() {
super.viewDidLoad()
…
joinChannel() // Agora - join the channel
}
将以下代码添加到joinChannel函数
func joinChannel() {

    // Set audio route to speaker

    self.agoraKit.setDefaultAudioRouteToSpeakerphone(true)

    // get the token - returns nil if no value is set

    let token = getValue(withKey: "token", within: "keys")

    // Join the channel

    self.agoraKit.joinChannel(byToken: token, channelId: self.channelName, info: nil, uid: 0) { (channel, uid, elapsed) in

      if self.debug {

          print("Successfully joined: \(channel), with \(uid): \(elapsed) secongs ago")

      }

    }

    UIApplication.shared.isIdleTimerDisabled = true     // Disable idle timmer

}
joinChannel函数将设备设置为使用扬声器进行音频播放,并加入ViewController.swift设置的频道。
注意:这个函数将尝试获取存储在keys.plist中的标记值。如果您想使用来自Agora Console的临时令牌,这里有一行代码。为了更加简单,我选择不使用令牌防护,因此我没有设置值。在本例中,函数将变成无值,并且Agora引擎不会对该频道使用基于令牌的防护措施。
现在用户可以加入一个频道了,接着我们需要添加离开频道的功能。与joinChannel类似,这两个视图控制器使用相同的函数来离开频道。分别在BroadcasterVC和AudienceVC中添加以下代码到leaveChannel函数。
func leaveChannel() {

    self.agoraKit.leaveChannel(nil)                     // leave channel and end chat

    self.sessionIsActive = false                        // session is no longer active

    UIApplication.shared.isIdleTimerDisabled = false    // Enable idle timer

}
leaveChannel函数会在popView和viewWillDisapear中被调用,因为我们希望确保用户可以在单击退出视图或他们关闭应用(后台/出口)时离开频道。
我们需要实现的最后一个视频聊天特性是toggleMic函数,它会在用户点击麦克风按钮时被调用。BroadcasterVC和AudienceVC都使用相同的函数,所以添加下面的代码到toggleMic函数。
@IBAction func toggleMic() {

    guard let activeMicImg = UIImage(named: "mic") else { return }

    guard let disabledMicImg = UIImage(named: "mute") else { return }

    if self.micBtn.imageView?.image == activeMicImg {

        self.agoraKit.muteLocalAudioStream(true) // Disable Mic using Agora Engine

        self.micBtn.setImage(disabledMicImg, for: .normal)

        if debug {

            print("disable active mic")

        }

    } else {

        self.agoraKit.muteLocalAudioStream(false) // Enable Mic using Agora Engine

        self.micBtn.setImage(activeMicImg, for: .normal)

        if debug {

            print("enable mic")

        }

    }

}
处理触控手势
在我们的应用程序中,AudienceVC将通过使用手指在屏幕上拖动来提供远程帮助。因此在AudienceVC中,我们需要捕捉并处理用户的触屏动作。
首先,我们需要捕捉用户最初触摸屏幕时的位置,并将该点设为起点。当用户在屏幕上拖动手指时,我们需要跟踪所有的触摸点,在这里我们将使用touchPoints数组来添加每个点,因此我们需要确保每个新触摸都有一个空数组。我更喜欢在touchesBegan中重置数组来减少用户需要增加第二根手指进行触屏动作的情况。
override func touchesBegan(_ touches: Set<UITouch>, with event: UIEvent?) {

    // get the initial touch event

    if self.sessionIsActive, let touch = touches.first {

        let position = touch.location(in: self.view)

        self.touchStart = position

        self.touchPoints = []

        if debug {

            print(position)

        }

    }

    // check if the color selection menu is visible

    if let colorSelectionBtn = self.colorSelectionBtn, colorSelectionBtn.alpha < 1 {

        toggleColorSelection() // make sure to hide the color menu

    }

}
注意:这个例子将只支持用一根手指绘图。支持多点触摸绘图是可能的,但它需要更多的功夫来跟踪触摸事件的唯一性。
为了处理手指的运动轨迹,我们需要使用Pan Gesture。通过Pan Gesture,我们可以检测到手势的开始、改变和结束状态。首先我们从注册Pan Gesture开始。
func setupGestures() {

    // pan gesture

    let panGesture = UIPanGestureRecognizer(target: self, action: #selector(handlePan(_:)))

    panGesture.delegate = self

    self.view.addGestureRecognizer(panGesture)

}
一旦Pan Gesture被识别,我们就可以计算手指触屏在视图中的位置。GestureRecognizer为我们提供了相对于手势初始触摸位置的触摸位置值。这意味着来自GestureRecognizer的GestureRecognizer.began初始坐标是(0,0)。self.touchStart将帮助我们计算触屏位置相对于视图坐标系统的x,y值。
@IBAction func handlePan(_ gestureRecognizer: UIPanGestureRecognizer) {

        // TODO: send touch started event

        // keep track of points captured during pan gesture

        if self.sessionIsActive && (gestureRecognizer.state == .began || gestureRecognizer.state == .changed) {

            let translation = gestureRecognizer.translation(in: self.view)

            // calculate touch movement relative to the superview

            guard let touchStart = self.touchStart else { return } // ignore accidental finger drags

            let pixelTranslation = CGPoint(x: touchStart.x + translation.x, y: touchStart.y + translation.y)

            // normalize the touch point to use view center as the reference point

            let translationFromCenter = CGPoint(x: pixelTranslation.x - (0.5 * self.view.frame.width), y: pixelTranslation.y - (0.5 * self.view.frame.height))

            self.touchPoints.append(pixelTranslation)

            // TODO: Send captured points

            DispatchQueue.main.async {

                // draw user touches to the DrawView

                guard let drawView = self.drawingView else { return }

                guard let lineColor: UIColor = self.lineColor else { return }

                let layer = CAShapeLayer()

                layer.path = UIBezierPath(roundedRect: CGRect(x:  pixelTranslation.x, y: pixelTranslation.y, width: 25, height: 25), cornerRadius: 50).cgPath

                layer.fillColor = lineColor.cgColor

                drawView.layer.addSublayer(layer)

            }

            if debug {

                print(translationFromCenter)

                print(pixelTranslation)

            }

        }

        if gestureRecognizer.state == .ended {

            // TODO: send message to remote user that touches have ended

            // clear list of points

            if let touchPointsList = self.touchPoints {

                self.touchStart = nil // clear starting point

                if debug {

                    print(touchPointsList)

                }

            }

        }

    }
一旦我们计算出pixelTranslation (x,y值相对于视图的坐标系统),我们就可以使用这些值来绘制屏幕上的点,并“标准化”这些点相对于屏幕中心点的位置。
稍后我将讨论规范化触摸,首先我们需要学习绘制屏幕上的触摸动作。由于我们要在屏幕上进行绘制,这里我们将用到主线程。在一个分派块中,我们会使用thepixelTranslation把点绘制到DrawingView中。当我们学习如何传输点的时候,我们再来处理删除点的问题,现在不要担心这个问题。
在我们可以传输用户的触摸信息之前,我们需要对相对于屏幕中心的点进行标准化。UIKit在视图的左上角计算初始位置(0,0),但是在ARKit中我们需要添加相对于ARCamera的中心点的点。为了实现这一点,我们需要减去视图一半的高度和宽度,然后使用pixelTranslation来计算translationFromCenter。
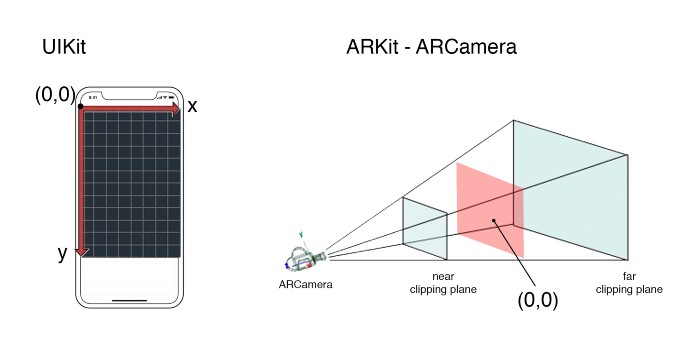
传输触屏信息和颜色值
为了添加交互式层,我们需要使用DataStream,它是Agora引擎的一部分的。Agora的视频SDK允许创建每秒最多可以发送30 (1kb)数据包的数据流。由于我们发送的都是小数据消息,它可以发挥很好的作用。
我们首先在firstRemoteVideoDecoded中启用DataStream。我们会在BroadcasterVC和AudienceVC上进行启用。
func rtcEngine(_ engine: AgoraRtcEngineKit, firstRemoteVideoDecodedOfUid uid:UInt, size:CGSize, elapsed:Int) {

  // ...

  if self.remoteUser == uid {

    // ...

    // create the data stream

    self.streamIsEnabled = self.agoraKit.createDataStream(&self.dataStreamId, reliable: true, ordered: true)

    if self.debug {

        print("Data Stream initiated - STATUS: \(self.streamIsEnabled)")

    }

  }

}
如果数据流成功启用,则self.streamIsEnabled的值为0。在尝试发送任何消息之前,我们都需要检查这个值是否为0。
现在已经成功启用了DataStream,我们将从AudienceVC开始发送触屏信息。让我们回想一下需要发送哪些数据:触点开始、触点结束、点和颜色值。从触屏发生开始,我们就需要更新PanGesture以发送合适的信息。
注意:Agora的视频SDK DataStream使用原始数据,因此我们需要将所有消息转换为字符串,然后使用.data属性传递原始数据字节。
@IBAction func handlePan(_ gestureRecognizer: UIPanGestureRecognizer) {

        if self.sessionIsActive && gestureRecognizer.state == .began && self.streamIsEnabled == 0 {

            // send message to remote user that touches have started

            self.agoraKit.sendStreamMessage(self.dataStreamId, data: "touch-start".data(using: String.Encoding.ascii)!)

        }

        if self.sessionIsActive && (gestureRecognizer.state == .began || gestureRecognizer.state == .changed) {

            let translation = gestureRecognizer.translation(in: self.view)

            // calculate touch movement relative to the superview

            guard let touchStart = self.touchStart else { return } // ignore accidental finger drags

            let pixelTranslation = CGPoint(x: touchStart.x + translation.x, y: touchStart.y + translation.y)

            // normalize the touch point to use view center as the reference point

            let translationFromCenter = CGPoint(x: pixelTranslation.x - (0.5 * self.view.frame.width), y: pixelTranslation.y - (0.5 * self.view.frame.height))

            self.touchPoints.append(pixelTranslation)

            if self.streamIsEnabled == 0 {

                // send data to remote user

                let pointToSend = CGPoint(x: translationFromCenter.x, y: translationFromCenter.y)

                self.dataPointsArray.append(pointToSend)

                if self.dataPointsArray.count == 10 {

                    sendTouchPoints() // send touch data to remote user

                    clearSubLayers() // remove touches drawn to the screen

                }

                if debug {

                    print("streaming data: \(pointToSend)\n - STRING: \(self.dataPointsArray)\n - DATA: \(self.dataPointsArray.description.data(using: String.Encoding.ascii)!)")

                }

            }

            DispatchQueue.main.async {

                // draw user touches to the DrawView

                guard let drawView = self.drawingView else { return }

                guard let lineColor: UIColor = self.lineColor else { return }

                let layer = CAShapeLayer()

                layer.path = UIBezierPath(roundedRect: CGRect(x:  pixelTranslation.x, y: pixelTranslation.y, width: 25, height: 25), cornerRadius: 50).cgPath

                layer.fillColor = lineColor.cgColor

                drawView.layer.addSublayer(layer)

            }

            if debug {

                print(translationFromCenter)

                print(pixelTranslation)

            }

        }

        if gestureRecognizer.state == .ended {

            // send message to remote user that touches have ended

            if self.streamIsEnabled == 0 {

                // transmit any left over points

                if self.dataPointsArray.count > 0 {

                    sendTouchPoints() // send touch data to remote user

                    clearSubLayers() // remove touches drawn to the screen

                }

                self.agoraKit.sendStreamMessage(self.dataStreamId, data: "touch-end".data(using: String.Encoding.ascii)!)

            }

            // clear list of points

            if let touchPointsList = self.touchPoints {

                self.touchStart = nil // clear starting point

                if debug {

                    print(touchPointsList)

                }

            }

        }

    }
ARKit以60帧每秒的速度运行,所以单独发送点会导致我们受到上限30个数据包的限制,从而导致无法发送点数据。因此,我们将把这些点添加到dataPointsArray中,并保持每10个点传输一次。每个触点大约是30-50字节,所以通过保持每10个点传输一次的频率,我们就可以满足数据令的限制。
func sendTouchPoints() {

    let pointsAsString: String = self.dataPointsArray.description

    self.agoraKit.sendStreamMessage(self.dataStreamId, data: pointsAsString.data(using: String.Encoding.ascii)!)

    self.dataPointsArray = []

}
在发送触摸数据的同时,我们可以清除DrawingView。为了操作方便,我们可以获得DrawingView子层,循环并从superlayer删除它们。
func clearSubLayers() {

    DispatchQueue.main.async {

        // loop through layers drawn from touches and remove them from the view

        guard let sublayers = self.drawingView.layer.sublayers else { return }

        for layer in sublayers {

            layer.isHidden = true

            layer.removeFromSuperlayer()

        }

    }

}
最后,我们需要添加对更改线条颜色的功能支持。我们将通过发送cgColor.components来获取字符串的颜色值,这些字符串以逗号分隔。我们将给消息加上颜色前缀:这样我们就不会混淆它和触屏数据。
@IBAction func setColor(_ sender: UIButton) {

    guard let colorSelectionBtn = self.colorSelectionBtn else { return }

    colorSelectionBtn.tintColor = sender.backgroundColor

    self.lineColor = colorSelectionBtn.tintColor

    toggleColorSelection()

    // send data message with color components

    if self.streamIsEnabled == 0 {

        guard let colorComponents = sender.backgroundColor?.cgColor.components else { return }

        self.agoraKit.sendStreamMessage(self.dataStreamId, data: "color: \(colorComponents)".data(using: String.Encoding.ascii)!)

        if debug {

            print("color: \(colorComponents)")

        }

    }

}
现在我们已经可以从AudienceVC发送数据,那么接下来我们将开始强化BroadcasterVC接收和解码数据的能力。我们将使用rtcEngine委托的receiveStreamMessage函数来处理从DataStream接收到的所有数据。
func rtcEngine(_ engine: AgoraRtcEngineKit, receiveStreamMessageFromUid uid: UInt, streamId: Int, data: Data) {

    // successfully received message from user

    guard let dataAsString = String(bytes: data, encoding: String.Encoding.ascii) else { return }

    if debug {

        print("STREAMID: \(streamId)\n - DATA: \(data)\n - STRING: \(dataAsString)\n")

    }

    // check data message

    switch dataAsString {

        case var dataString where dataString.contains("color:"):

            if debug {

                print("color msg recieved\n - \(dataString)")

            }

            // remove the [ ] characters from the string

            if let closeBracketIndex = dataString.firstIndex(of: "]") {

                dataString.remove(at: closeBracketIndex)

                dataString = dataString.replacingOccurrences(of: "color: [", with: "")

            }

             // convert the string into an array -- using , as delimeter

            let colorComponentsStringArray = dataString.components(separatedBy: ", ")

            // safely convert the string values into numbers

            guard let redColor = NumberFormatter().number(from: colorComponentsStringArray[0]) else { return }

            guard let greenColor = NumberFormatter().number(from: colorComponentsStringArray[1]) else { return }

            guard let blueColor = NumberFormatter().number(from: colorComponentsStringArray[2]) else { return }

            guard let colorAlpha = NumberFormatter().number(from: colorComponentsStringArray[3]) else { return }

            // set line color to UIColor from remote user

            self.lineColor = UIColor.init(red: CGFloat(truncating: redColor), green: CGFloat(truncating: greenColor), blue: CGFloat(truncating:blueColor), alpha: CGFloat(truncating:colorAlpha))

        case "undo":

            // TODO: add undo

        case "touch-start":

            // touch-starts

            print("touch-start msg recieved")

            // TODO: handle event

        case "touch-end":

            if debug {

                print("touch-end msg recieved")

            }

        default:

            if debug {

                print("touch points msg recieved")

            }

            // TODO: add points in ARSCN

    }

}
我们需要考虑到多种不同的情况,因此我们需要使用一个转换器来检查并处理消息。
当我们收到更改颜色的消息时,我们需要隔离组件值,因此我们需要从字符串中删除任何多余的字符,然后我们就可以使用组件来初始化UIColor。
在下一节中,我们将处理触摸开始的信息并将触摸点添加到ARSCN中。
在AR中呈现手势
在接收到一个触屏动作已经开始的信息后,我们需要在场景中添加一个新节点,然后父化这个节点的所有触屏信息。这样做是为了将所有的触点进行分组,并迫使它们始终面向ARCamera进行旋转。
case "touch-start":

    print("touch-start msg recieved")

    // add root node for points received

    guard let pointOfView = self.sceneView.pointOfView else { return }

    let transform = pointOfView.transform // transformation matrix

    let orientation = SCNVector3(-transform.m31, -transform.m32, -transform.m33) // camera rotation

    let location = SCNVector3(transform.m41, transform.m42, transform.m43) // location of camera frustum

    let currentPostionOfCamera = orientation + location // center of frustum in world space

    DispatchQueue.main.async {

        let touchRootNode : SCNNode = SCNNode() // create an empty node to serve as our root for the incoming points

        touchRootNode.position = currentPostionOfCamera // place the root node ad the center of the camera's frustum

        touchRootNode.scale = SCNVector3(1.25, 1.25, 1.25)// touches projected in Z will appear smaller than expected - increase scale of root node to compensate

        guard let sceneView = self.sceneView else { return }

        sceneView.scene.rootNode.addChildNode(touchRootNode) // add the root node to the scene

        let constraint = SCNLookAtConstraint(target: self.sceneView.pointOfView) // force root node to always face the camera

        constraint.isGimbalLockEnabled = true // enable gimbal locking to avoid issues with rotations from LookAtConstraint

        touchRootNode.constraints = [constraint] // apply LookAtConstraint

        self.touchRoots.append(touchRootNode)

    }
注意:我们需要施加LookAt约束,以确保绘制的点一直面向用户。同时需要绘制的点必须一直面向摄像头。
当我们接收触屏点的信息时,我们需要将字符串解码成一个CGPoints数组,然后我们要将它附加到self.remotePoints数组。
default:

    if debug {

        print("touch points msg recieved")

    }

    // convert data string into an array -- using given pattern as delimeter

    let arrayOfPoints = dataAsString.components(separatedBy: "), (")

    if debug {

        print("arrayOfPoints: \(arrayOfPoints)")

    }

    for pointString in arrayOfPoints {

        let pointArray: [String] = pointString.components(separatedBy: ", ")

        // make sure we have 2 points and convert them from String to number

        if pointArray.count == 2, let x = NumberFormatter().number(from: pointArray[0]), let y = NumberFormatter().number(from: pointArray[1]) {

            let remotePoint: CGPoint = CGPoint(x: CGFloat(truncating: x), y: CGFloat(truncating: y))

            self.remotePoints.append(remotePoint)

            if debug {

                print("POINT - \(pointString)")

                print("CGPOINT: \(remotePoint)")

            }

        }

    }
在会话委派的didUpdate中,我们将检查self.remotePoints数组。我们将从列表中弹出第一个点,并在每个帧中呈现一个点,以创建正在绘制的线的效果。我们把节点父级设置成一个根节点,该根节点一收到触屏开始的消息就会创建需要的效果。
func session(_ session: ARSession, didUpdate frame: ARFrame) {

    // if we have points - draw one point per frame

    if self.remotePoints.count > 0 {

        let remotePoint: CGPoint = self.remotePoints.removeFirst() // pop the first node every frame

        DispatchQueue.main.async {

            guard let touchRootNode = self.touchRoots.last else { return }

            let sphereNode : SCNNode = SCNNode(geometry: SCNSphere(radius: 0.015))

            sphereNode.position = SCNVector3(-1*Float(remotePoint.x/1000), -1*Float(remotePoint.y/1000), 0)

            sphereNode.geometry?.firstMaterial?.diffuse.contents = self.lineColor

            touchRootNode.addChildNode(sphereNode)  // add point to the active root

        }

    }

}
增加撤销功能
设置好数据传输层后,我们可以快速跟踪每个触摸手势并撤销它。我们将从AudienceVC向BroadcasterVC发送撤销消息开始创建撤销功能。我们需要将下面的代码添加到AudienceVC中的sendUndoMsg函数。
@IBAction func sendUndoMsg() {

    // if data stream is enabled, send undo message

    if self.streamIsEnabled == 0 {

        self.agoraKit.sendStreamMessage(self.dataStreamId, data: "undo".data(using: String.Encoding.ascii)!)

    }

}
在BroadcasterVC中,我们将检查rtcEngine委托的receiveStreamMessage函数中的撤销消息。因为每一组接触点都是它们自己根节点的父节点,所以对于每一条撤销消息,我们都需要在场景中删除(数组中的)最后一个根节点。
case "undo":

    if !self.touchRoots.isEmpty {

        let latestTouchRoot: SCNNode = self.touchRoots.removeLast()

        latestTouchRoot.isHidden = true

        latestTouchRoot.removeFromParentNode()

    }
构建和运行
现在我们已经准备好构建和运行应用程序了。插入两个测试设备,在每个设备上构建和运行应用程序。在一个设备上输入频道名称并创建频道,然后在另一个设备上输入频道名称并加入频道。

感谢和我一起进行编程,下面是一个完整项目的链接。通过这个应用,我们可以任意地派生和发出拉取请求。


